本文使用「署名 4.0 国际 (CC BY 4.0)」许可协议,欢迎转载、或重新修改使用,但需要注明来源。 [署名 4.0 国际 (CC BY 4.0)](https://creativecommons.org/licenses/by/4.0/deed.zh)
本文作者: 苏洋
创建时间: 2021年06月23日
统计字数: 6349字
阅读时间: 13分钟阅读
本文链接: https://soulteary.com/2021/06/23/talk-about-php-application-dockerize-from-dokuwiki.html
-----
# 从 DokuWiki 聊聊 PHP 应用容器封装
本文将介绍如何针对类似 DokuWiki 的 PHP 应用进行容器化。
相比较其他的软件,DokuWiki 具备很强的优势:易于安装和使用、资源占有量低,可以脱离传统数据库使用。
## 写在前面
看到标题你或许会想,容器化这么“简单”为什么还要写呢,况且在 2019 年年初的时候,曾写过一篇文章:《[使用 Docker 搭建你的Wiki(DokuWiki)](https://soulteary.com/2019/02/11/build-your-own-wiki-with-docker-dokuwiki.html)》 ,不就讲了如何快速的使用容器启动服务吗?
原因有两个。
那篇文章中,使用的是 BitNami 的镜像,对于应用数据处理存在问题,用户无法针对性的只挂载某一个、某几个目录,必须将所有数据都进行挂载,这样非常不利于数据存储,另外这个镜像比我重新构建的镜像大了一倍有余,资源使用效率相对低了一些。
针对 PHP 项目的容器化封装,之前介绍的比较少,但是在日常工作、学习过程中,PHP 项目的数量还是挺多的,正好借此机会聊聊。
## 选择容器运行环境
在官方网站中,我们可以看到 DokuWiki 有两条清晰的产品发布线:稳定版和即将推出的版本 [https://www.dokuwiki.org/changes](https://www.dokuwiki.org/changes)。
封装容器前,需要了解的一条重要的线索是:软件依赖什么版本的 Runtime。
当前版本的 DokuWiki 具备一定的 PHP 7.4 兼容性,而未来的版本将抛弃对 PHP 7.2 的支持,迎接 PHP 8。除此之外,我们还需要关注一件事,插件兼容性,通常情况下,许多插件只针对某个应用版本编写,在缺乏维护的情况下,难以保障它和语言版本的兼容性,除非语言始终保持向前兼容。
所以,这里比较稳妥的选择是使用 PHP 7.3 或 PHP 7.4 两个版本作为运行环境,本篇文章,考虑到编译安装插件的流程和最终镜像尺寸,我选择了 PHP 7.3 ,一个“进退自如”的版本。
此外,在官方 [GitHub 提交](https://github.com/splitbrain/dokuwiki/commit/a417911a65824ae559bcb9f47df821a34094d2cf)中,维护者已经添加了针对 PHP 8 的版本测试,相关 CI 过程看起来[一切正常](https://github.com/splitbrain/dokuwiki/actions),相信新版本将会在不久发布。未来新版本发布后,我们可以先使用 PHP 7.3 过度,等到相关插件完成升级后,再升级到 PHP8。
## 编写容器镜像文件
PHP 应用的镜像封装主要有以下几部分构成:运行环境选择、基础环境配置、应用和应用依赖安装、应用默认配置设定、配置启动入口。
我们依次来聊聊。
### 运行环境选择
关于容器运行环境选择,常见场景是关于 FPM 和 Apache 版本、以及基于不同系统发行版的选择,选择前者,意味着你希望使用外部 Web Server (比如 Nginx)提供 Web 响应能力,进行更细粒度的调整和控制能力。选择后者,则意味着“省事”,虽然不符合容器单一进程哲学,但是在这类 PHP 镜像的巨大下载量面前,“哲学”也需要尊重客观需求。
这里,我们也选择“省事”的方案:
```bash
FROM php:7.3-apache
```
### 基础环境配置
基础环境配置主要包含三部分,系统基础软件配置安装和系统级别的模块或软件依赖安装,以及PHP 系统参数配置。
除此之外,因为一些原因,在国内下载海外的软件包存在速度比较慢的情况,为了提升构建速度,我们一般会配置国内镜像进行加速,当然,追求极致的你,也可以使用之前文章中提到过的《[使用容器搭建 APT Cacher NG 缓存代理服务](https://soulteary.com/2021/04/12/use-docker-to-build-apt-cacher-ng-caching-proxy-service.html)》的方法,进一步进行软件包下载的速度优化。
```bash
ENV DEBIAN_FRONTEND=noninteractive
RUN set -eux; \
sed -i -e "s/security.debian.org/mirrors.tuna.tsinghua.edu.cn/" /etc/apt/sources.list; \
sed -i -e "s/deb.debian.org/mirrors.tuna.tsinghua.edu.cn/" /etc/apt/sources.list; \
apt update; \
apt-get update --fix-missing; \
apt install -y tzdata curl wget; \
rm -rf /var/lib/apt/lists/*
```
有了上面的配置后,后续构建镜像过程中,都将使用清华源进行依赖下载,将会大幅减少构建上的时间成本损耗。
关于基础模块安装,我这里使用了 Docker 官方仓库中的 WordPress 的[代码片段](https://github.com/docker-library/wordpress/blob/master/latest/php7.3/apache/Dockerfile)(略有修改)。
```bash
RUN set -ex; \
\
savedAptMark="$(apt-mark showmanual)"; \
\
apt-get update; \
apt-get install -y --no-install-recommends \
libfreetype6-dev \
libjpeg-dev \
libmagickwand-dev \
libpng-dev \
libzip-dev \
; \
\
docker-php-ext-configure gd \
--with-freetype-dir=/usr \
--with-jpeg-dir=/usr \
--with-png-dir=/usr \
; \
docker-php-ext-install -j "$(nproc)" \
bcmath \
exif \
gd \
zip \
; \
pecl install imagick-3.4.4; \
docker-php-ext-enable imagick; \
rm -r /tmp/pear; \
\
# reset apt-mark's "manual" list so that "purge --auto-remove" will remove all build dependencies
apt-mark auto '.*' > /dev/null; \
apt-mark manual $savedAptMark; \
ldd "$(php -r 'echo ini_get("extension_dir");')"/*.so \
| awk '/=>/ { print $3 }' \
| sort -u \
| xargs -r dpkg-query -S \
| cut -d: -f1 \
| sort -u \
| xargs -rt apt-mark manual; \
\
apt-get purge -y --auto-remove -o APT::AutoRemove::RecommendsImportant=false; \
rm -rf /var/lib/apt/lists/*
# set recommended PHP.ini settings
# see https://secure.php.net/manual/en/opcache.installation.php
RUN set -eux; \
docker-php-ext-enable opcache; \
{ \
echo 'opcache.memory_consumption=128'; \
echo 'opcache.interned_strings_buffer=8'; \
echo 'opcache.max_accelerated_files=4000'; \
echo 'opcache.revalidate_freq=2'; \
echo 'opcache.fast_shutdown=1'; \
} > /usr/local/etc/php/conf.d/opcache-recommended.ini
# https://wordpress.org/support/article/editing-wp-config-php/#configure-error-logging
RUN { \
# https://www.php.net/manual/en/errorfunc.constants.php
# https://github.com/docker-library/wordpress/issues/420#issuecomment-517839670
echo 'error_reporting = E_ERROR | E_WARNING | E_PARSE | E_CORE_ERROR | E_CORE_WARNING | E_COMPILE_ERROR | E_COMPILE_WARNING | E_RECOVERABLE_ERROR'; \
echo 'display_errors = Off'; \
echo 'display_startup_errors = Off'; \
echo 'log_errors = On'; \
echo 'error_log = /dev/stderr'; \
echo 'log_errors_max_len = 1024'; \
echo 'ignore_repeated_errors = On'; \
echo 'ignore_repeated_source = Off'; \
echo 'html_errors = Off'; \
} > /usr/local/etc/php/conf.d/error-logging.ini
RUN set -eux; \
a2enmod rewrite expires; \
\
# https://httpd.apache.org/docs/2.4/mod/mod_remoteip.html
a2enmod remoteip; \
{ \
echo 'RemoteIPHeader X-Forwarded-For'; \
# these IP ranges are reserved for "private" use and should thus *usually* be safe inside Docker
echo 'RemoteIPTrustedProxy 10.0.0.0/8'; \
echo 'RemoteIPTrustedProxy 172.16.0.0/12'; \
echo 'RemoteIPTrustedProxy 192.168.0.0/16'; \
echo 'RemoteIPTrustedProxy 169.254.0.0/16'; \
echo 'RemoteIPTrustedProxy 127.0.0.0/8'; \
} > /etc/apache2/conf-available/remoteip.conf; \
a2enconf remoteip; \
# https://github.com/docker-library/wordpress/issues/383#issuecomment-507886512
# (replace all instances of "%h" with "%a" in LogFormat)
find /etc/apache2 -type f -name '*.conf' -exec sed -ri 's/([[:space:]]*LogFormat[[:space:]]+"[^"]*)%h([^"]*")/\1%a\2/g' '{}' +
```
这段代码片段解决了一些常见问题,诸如如何正确的安装 GD 库、Imageick,如何在容器环境中获取正确的访问 IP 地址,如果你感兴趣,可以浏览代码片段里的注释状态的链接,获取更详细的信息。
### 应用和应用依赖安装
容器内的 PHP 应用安装,一般分为两种,使用源代码压缩包进行安装,和使用系统软件包(如:APT)进行安装。
本篇文章,使用通用性更好的源代码压缩包方式来安装,考虑到镜像的可维护性,我们将软件包的版本进行参数化处理、并针对代码包进行指纹检查,避免一些“安全问题”出现:
```bash
ARG DOKUWIKI_VERSION=2020-07-29
ARG DOKUWIKI_SHASUM=119f3875d023d15070068a6aca1e23acd7f9a19a
RUN set -eux; \
curl -o dokuwiki-stable.tgz -fL "https://download.dokuwiki.org/src/dokuwiki/dokuwiki-stable.tgz"; \
echo "$DOKUWIKI_SHASUM dokuwiki-stable.tgz" | sha1sum -c -; \
\
tar -xvf dokuwiki-stable.tgz -C /usr/src/; \
rm dokuwiki-stable.tgz; \
mkdir -p /usr/src/dokuwiki; \
cp -r /usr/src/dokuwiki-$DOKUWIKI_VERSION/* /usr/src/dokuwiki; \
rm -rf /usr/src/dokuwiki-$DOKUWIKI_VERSION; \
chown -R www-data:www-data /usr/src/dokuwiki;
```
使用这样的模式构建镜像有个显而易见的好处,当应用推出新版本时,我们可以使用非常小的成本重新构建镜像,基础部分完全不需要重新构建,可以极大的复用之前的 Docker Layer 缓存,以及避免了应用更新时,需要对 Dockerfile 的更新维护,修改其中应用相关的内容。
而 PHP 应用的依赖安装,也一般分为两种,一种是“系统级别”的依赖,我们在上文中有提到,另外一种是基于 Composer 的软件包依赖,其核心原理是 composer 通过读取项目依赖配置文件,下载应用依赖的代码包,然后动态生成一个 loader 文件,提供应用使用。
DokuWiki 并没有使用 Composer ,所以这部分,我们留到下一个 PHP 应用容器化中再聊。
如果你对 Composer 感兴趣,可以翻阅之前的文章:
- [搭建高性能的私有 Composer 镜像服务](https://soulteary.com/2019/08/23/build-a-high-performance-private-composer-image-service.html)
- [如何搭配 CI 系统使用 Composer](https://soulteary.com/2019/08/24/how-to-use-composer-with-ci-system.html)
### 应用配置设置
应用配置设置一般是指对应用使用的配置文件进行默认配置创建和变更、对数据库进行初始化、对应用依赖的 Web 服务器规则进行配置。
关于应用配置文件的创建和内容修改,这里我们推荐的方式是使用文件挂载,或者应用启动后动态分发的模式来做,将“用户文件”和“默认程序文件”进行解耦。
前文提到过 DokuWiki 安装简单,可以不必依赖数据库,所以数据库初始化这部分我们留到其他应用中再聊。
针对 Web 服务器的规则配置,一般情况下,也推荐和应用配置文件一样的方式处理,不过如果这个配置不需要变更,属于“固定套路”,则可以通过下面的方式来初始化:
```bash
RUN [ ! -e /usr/src/dokuwiki/.htaccess ]; \
{ \
echo 'Options -Indexes -MultiViews +FollowSymLinks'; \
echo ' '; \
echo ' '; \
echo ' Require all denied'; \
echo ' '; \
echo ' '; \
echo ' Order allow,deny'; \
echo ' Deny from all'; \
echo ' '; \
echo ' '; \
echo ' '; \
echo ' RedirectMatch 404 /\.git'; \
echo ' '; \
echo 'RewriteEngine on'; \
echo 'RewriteRule ^_media/(.*) lib/exe/fetch.php?media=$1 [QSA,L]'; \
echo 'RewriteRule ^_detail/(.*) lib/exe/detail.php?media=$1 [QSA,L]'; \
echo 'RewriteRule ^_export/([^/]+)/(.*) doku.php?do=export_$1&id=$2 [QSA,L]'; \
echo 'RewriteRule ^$ doku.php [L]'; \
echo 'RewriteCond %{REQUEST_FILENAME} !-f'; \
echo 'RewriteCond %{REQUEST_FILENAME} !-d'; \
echo 'RewriteRule (.*) doku.php?id=$1 [QSA,L]'; \
echo 'RewriteRule ^index.php$ doku.php'; \
echo 'RewriteBase /'; \
} > /usr/src/dokuwiki/.htaccess; \
\
chown -R www-data:www-data /usr/src/dokuwiki;
```
### 配置启动入口
许多时候,对于 PHP 应用我们不必配置应用启动入口,只需要声明程序以何种方式运行在前台即可(瘦容器范畴)。
```bash
CMD ["apache2-foreground"]
```
但是如果涉及到部分文件挂载的场景,或者启动后,根据环境变量来执行“post-scripts”处理逻辑、根据运行网络来进行额外的增量操作的话,编写一个 docker-entrypoint 脚本就显得十分必要了。
```bash
COPY docker-entrypoint.sh /usr/local/bin/
ENTRYPOINT ["docker-entrypoint.sh"]
CMD ["apache2-foreground"]
```
出于懒,这里也使用了 Docker 仓库中的 WordPress [代码片段](https://github.com/docker-library/wordpress/blob/master/latest/php7.3/apache/docker-entrypoint.sh),并针对 DokuWiki 进行了调整:
```bash
#!/usr/bin/env bash
set -Eeuo pipefail
if [[ "$1" == apache2* ]] || [ "$1" = 'php-fpm' ]; then
uid="$(id -u)"
gid="$(id -g)"
if [ "$uid" = '0' ]; then
case "$1" in
apache2*)
user="${APACHE_RUN_USER:-www-data}"
group="${APACHE_RUN_GROUP:-www-data}"
# strip off any '#' symbol ('#1000' is valid syntax for Apache)
pound='#'
user="${user#$pound}"
group="${group#$pound}"
;;
*) # php-fpm
user='www-data'
group='www-data'
;;
esac
else
user="$uid"
group="$gid"
fi
if [ ! -e index.php ] && [ ! -e VERSION ]; then
# if the directory exists and dokuwiki doesn't appear to be installed AND the permissions of it are root:root, let's chown it (likely a Docker-created directory)
if [ "$uid" = '0' ] && [ "$(stat -c '%u:%g' .)" = '0:0' ]; then
chown "$user:$group" .
fi
echo >&2 "dokuwiki not found in $PWD - copying now..."
if [ -n "$(find -mindepth 1 -maxdepth 1 -not -name wp-content)" ]; then
echo >&2 "WARNING: $PWD is not empty! (copying anyhow)"
fi
sourceTarArgs=(
--create
--file -
--directory /usr/src/dokuwiki
--owner "$user" --group "$group"
)
targetTarArgs=(
--extract
--file -
)
if [ "$uid" != '0' ]; then
# avoid "tar: .: Cannot utime: Operation not permitted" and "tar: .: Cannot change mode to rwxr-xr-x: Operation not permitted"
targetTarArgs+=( --no-overwrite-dir )
fi
# loop over "pluggable" content in the source, and if it already exists in the destination, skip it
# https://github.com/docker-library/wordpress/issues/506 ("wp-content" persisted, "akismet" updated, dokuwiki container restarted/recreated, "akismet" downgraded)
for contentPath in \
/usr/src/dokuwiki/.htaccess \
/usr/src/dokuwiki/data/*/*/ \
/usr/src/dokuwiki/conf/* \
/usr/src/dokuwiki/lib/*/* \
; do
contentPath="${contentPath%/}"
[ -e "$contentPath" ] || continue
contentPath="${contentPath#/usr/src/dokuwiki/}" # "wp-content/plugins/akismet", etc.
if [ -e "$PWD/$contentPath" ]; then
echo >&2 "WARNING: '$PWD/$contentPath' exists! (not copying the dokuwiki version)"
sourceTarArgs+=( --exclude "./$contentPath" )
fi
done
tar "${sourceTarArgs[@]}" . | tar "${targetTarArgs[@]}"
echo >&2 "Complete! dokuwiki has been successfully copied to $PWD"
fi
fi
if [ -d /var/www/patches/inc/ ]; then
for contentPath in \
/var/www/patches/inc/* \
; do
cp $contentPath /var/www/html/inc/
echo "Patch:$contentPath"
done
fi
exec "$@"
```
上面的启动脚本主要做了三件事:
1. 将应用源代码扔到 Web 服务器使用的目录中,并设置好严格的权限。
2. 针对用户将应用部分文件映射到本地的情况,进行一些额外的数据初始化操作,避免用户挂载文件后,产生应用运行异常的问题。
3. 使用轻量的文件补丁的方式来对应用插件、模版之外的应用核心文件进行修改、替换。
## 编写容器编排文件
结合上面的容器配置,不难写出清晰的声明式的编排文件。
```yaml
version: "2"
services:
dokuwiki:
image: soulteary/docker-dokuwiki:2020-07-29
ports:
- 8080:80
environment:
- TZ=Asia/Shanghai
volumes:
- ./pages:/var/www/html/data/pages:rw
- ./meta:/var/www/html/data/meta:rw
- ./media:/var/www/html/data/media:rw
- ./conf:/var/www/html/conf:rw
- ./plugins:/var/www/html/lib/plugins:rw
- ./docker-entrypoint.sh:/usr/local/bin/docker-entrypoint.sh:ro
- ./patches:/var/www/patches:ro
logging:
driver: "json-file"
options:
max-size: "1m"
```
将上面的文件保存为 `docker-compose.yml`,然后使用 `docker-compose up -d` 启动应用,浏览器访问 8080 就能看到运行在容器中的 DokuWiki 啦。

如果你是 Traefik 用户,则可以使用下面的配置:
```yaml
version: "2"
services:
dokuwiki:
image: soulteary/docker-dokuwiki:2020-07-29
networks:
- traefik
expose:
- 80
environment:
- TZ=Asia/Shanghai
volumes:
- ./pages:/var/www/html/data/pages:rw
- ./meta:/var/www/html/data/meta:rw
- ./media:/var/www/html/data/media:rw
- ./conf:/var/www/html/conf:rw
- ./plugins:/var/www/html/lib/plugins:rw
- ./docker-entrypoint.sh:/usr/local/bin/docker-entrypoint.sh:ro
- ./patches:/var/www/patches:ro
labels:
- "traefik.enable=true"
- "traefik.docker.network=traefik"
- "traefik.http.routers.dokuwiki-web.middlewares=https-redirect@file"
- "traefik.http.routers.dokuwiki-web.entrypoints=http"
- "traefik.http.routers.dokuwiki-web.rule=Host(`dokuwiki.wiki`)"
- "traefik.http.routers.dokuwiki-web.service=dashboard@internal"
- "traefik.http.routers.dokuwiki-ssl.entrypoints=https"
- "traefik.http.routers.dokuwiki-ssl.rule=Host(`dokuwiki.wiki`)"
- "traefik.http.routers.dokuwiki-ssl.tls=true"
- "traefik.http.services.dokuwiki-backend.loadbalancer.server.scheme=http"
- "traefik.http.services.dokuwiki-backend.loadbalancer.server.port=80"
extra_hosts:
- "dokuwiki.wiki:127.0.0.1"
logging:
driver: "json-file"
options:
max-size: "1m"
networks:
traefik:
external: true
```
## 应用初始化
上文中,虽然看到 DokuWiki 已经运行起来了,但是在正式使用之前,还需要进行一次“安装配置”,访问浏览器地址“/install.php”,进入 DokuWiki Installer。
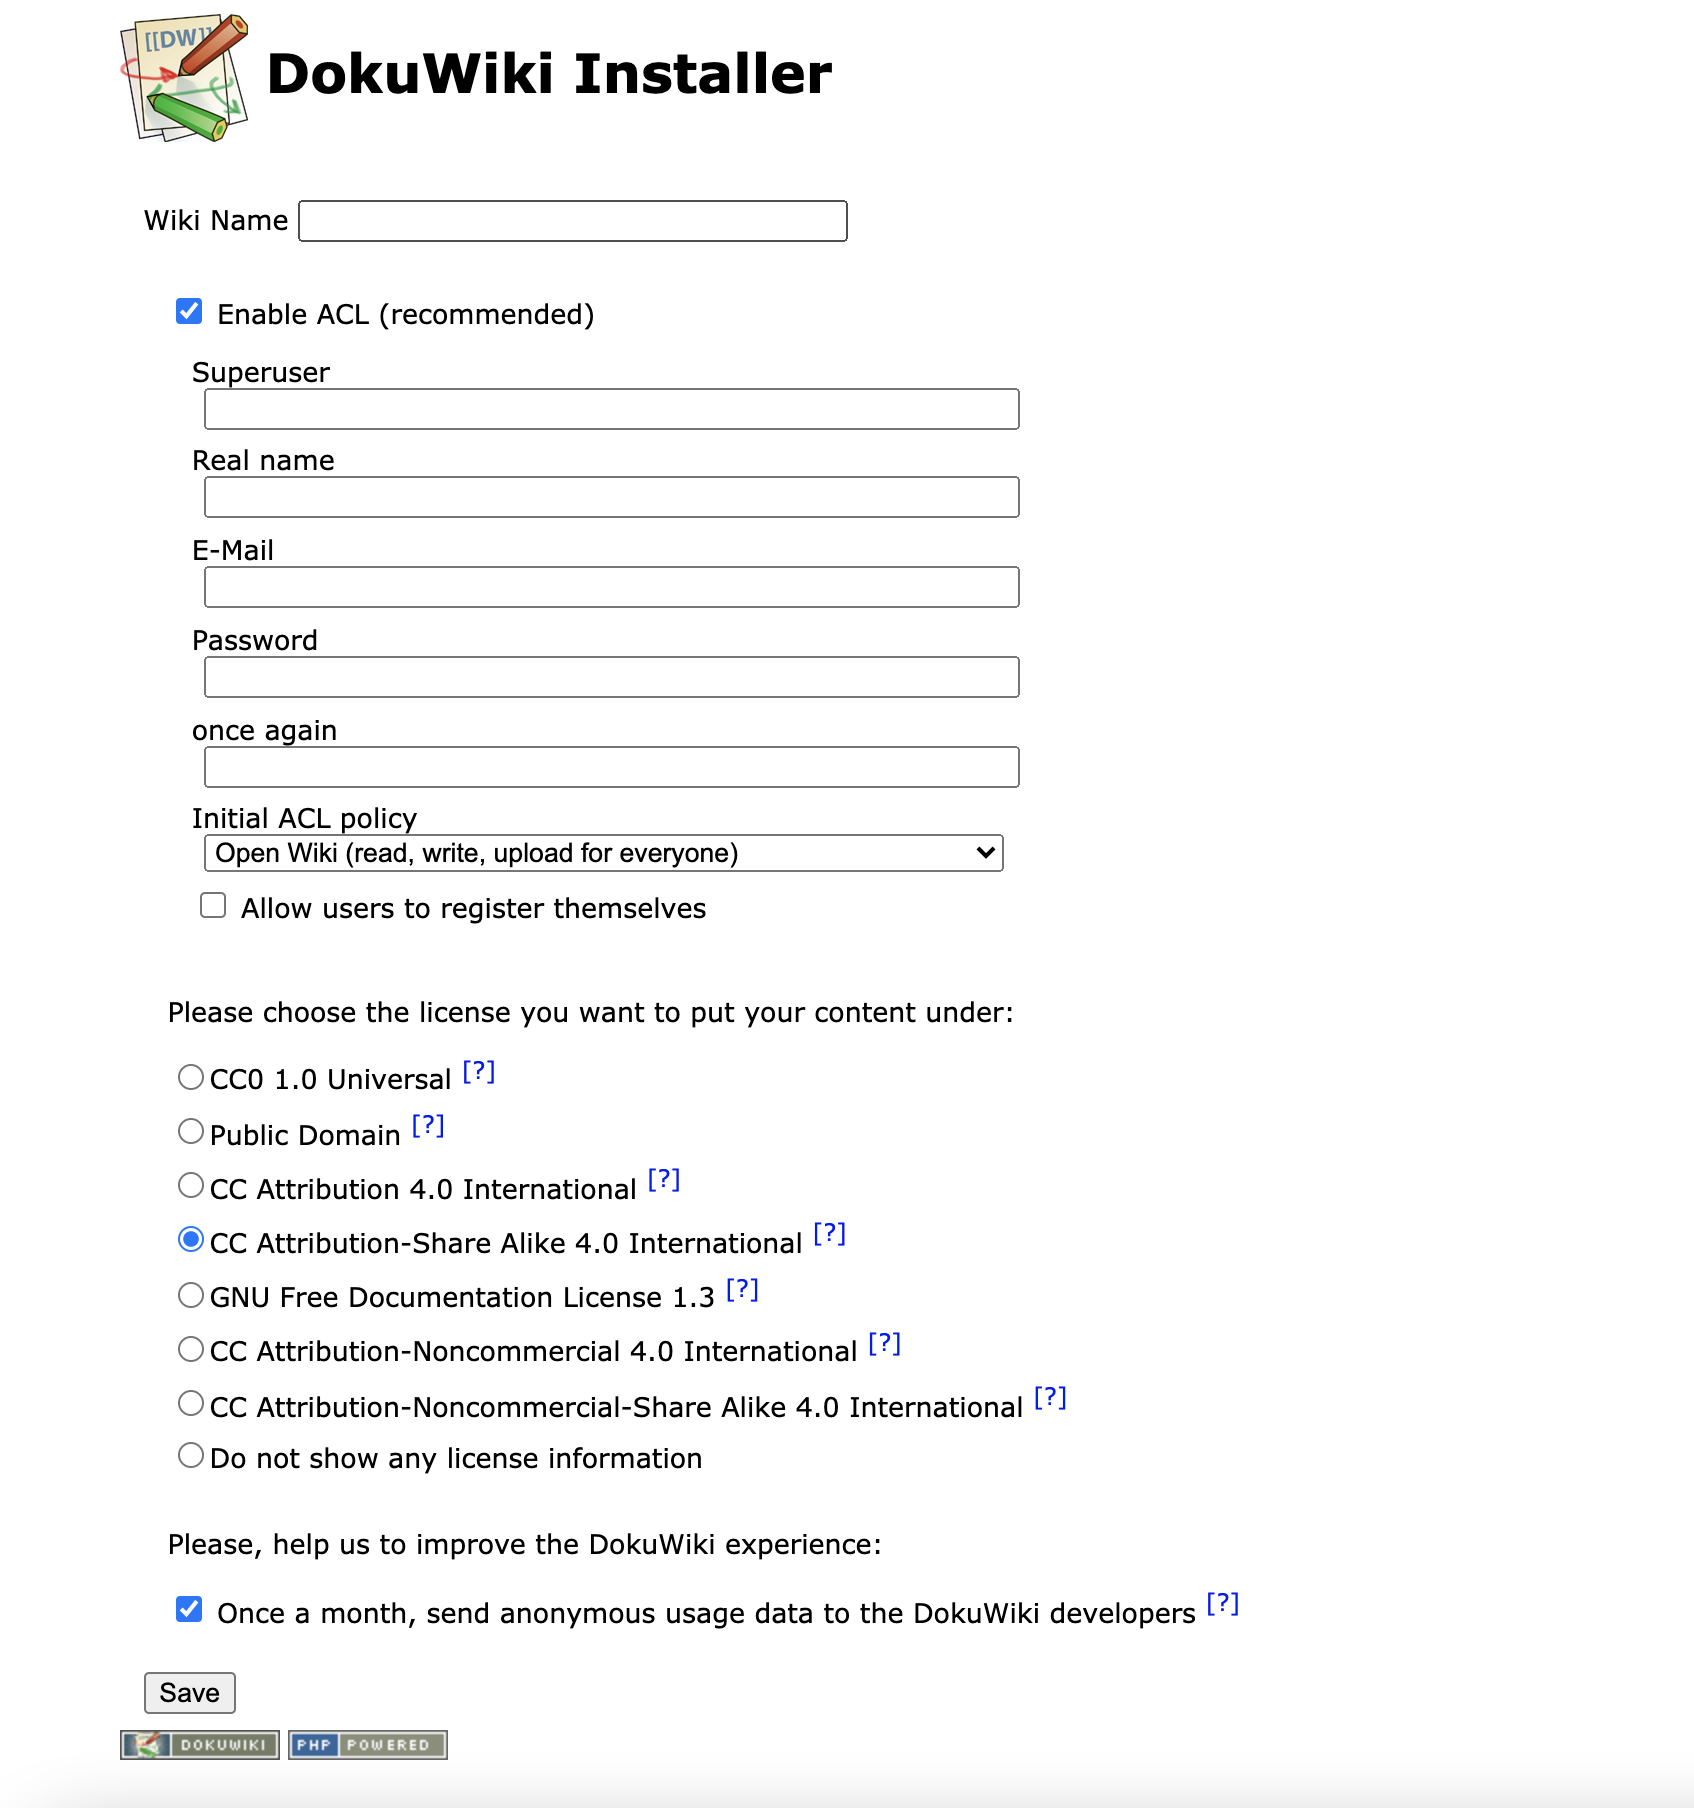
根据自己的需要填写相关信息,点击 “Save”,大概1~2秒种后,页面跳转并提示“初始化完成”。此时,就可以正式开启 DokuWiki 之旅了。更多关于 DokuWiki 的使用细节和优化,本篇文章不做继续展开,我们在后续文章中再聊。
## 其他
文章中的相关代码,我已经上传至 GitHub:[https://github.com/soulteary/docker-dokuwiki](https://github.com/soulteary/docker-dokuwiki),欢迎提交 PR,一起让应用镜像变的更加完善。
## 最后
下一篇 DokuWiki 相关的文章里,将分享一下如何更好的使用它,作为知识管理、项目管理、个人博客、甚至是 CMS 使用。
--EOF