本文使用「署名 4.0 国际 (CC BY 4.0)」许可协议,欢迎转载、或重新修改使用,但需要注明来源。 [署名 4.0 国际 (CC BY 4.0)](https://creativecommons.org/licenses/by/4.0/deed.zh)
本文作者: 苏洋
创建时间: 2022年09月30日
统计字数: 14653字
阅读时间: 30分钟阅读
本文链接: https://soulteary.com/2022/09/30/nlp-text-sentiment-analysis-application-using-docker-and-huggingface.html
-----
# 使用 Docker 和 HuggingFace 实现 NLP 文本情感分析应用
在继续分享“干燥、有趣”的[向量数据库实战](https://soulteary.com/tags/%e5%90%91%e9%87%8f%e6%95%b0%e6%8d%ae%e5%ba%93.html)内容之前,我们来聊一篇简单有趣的内容:如何使用 Docker 和 HuggingFace 现成的模型,快速实现一个 NLP 文本情感分析应用,支持中英文内容的情感快速分析。
在这篇文章里,我们不需要准备显卡和语料,也不需要耐心等待“炼丹”就绪,只要会“搭积木”,就能够实现这样一个有趣的小工具。
## 写在前面
本篇内容,作为后续内容的前置内容(工具),我们来聊聊如何将 HuggingFace 模型使用 Docker 封装为 AI 应用。出于一些原因,我希望能够对数据进行情感分析判断,然而目前并没有简单好用的工具可以帮助我实现这个事情,尤其是我的数据更多是基于中文数据、HuggingFace 上开源开放、允许低资源量运行的模型更多是基于英文数据训练而成。为了简单的解决这个问题,我将 HuggingFace 上的两个模型组合在了一起,用一个偷懒的办法,解决了“中文数据在英文模型”中使用的问题。
早些时候,分享过的两篇内容《[使用 Docker 来运行 HuggingFace 海量模型](https://soulteary.com/2022/05/20/use-docker-to-run-huggingface-models.html) 》 、《[用让新海诚本人惊讶的 AI 模型制作属于你的动漫视频](https://soulteary.com/2022/06/04/create-your-own-anime-video-with-an-ai-model-that-surprised-makoto-shinkai.html#%E5%87%86%E5%A4%87%E5%B7%A5%E4%BD%9C)》里,有聊过使用 Docker、Towhee 来将 HuggingFace 模型快速转变为 AI 应用,如果你对图像处理感兴趣,可以翻阅这两篇内容。
想要愉快的阅读和跟着本文游玩,需要 Docker 以及 Python 环境,可以参考上面两篇文章,或者《[在笔记本上搭建高性价比的 Linux 学习环境:基础篇](https://soulteary.com/2022/06/21/building-a-cost-effective-linux-learning-environment-on-a-laptop-the-basics.html)》文章完成基础环境的准备,再次就不过多赘述了。
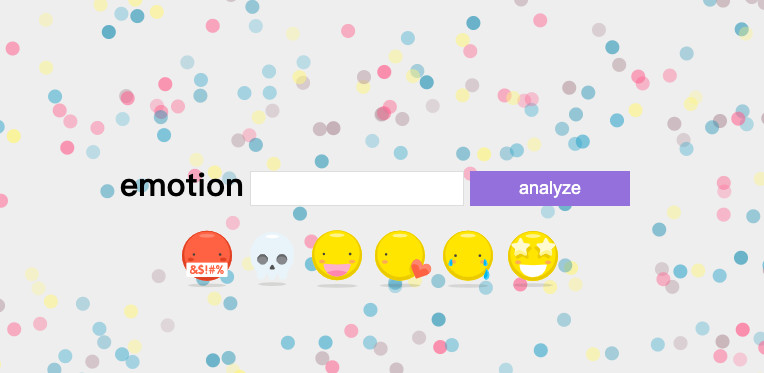
## 实现效果
先来看下最终实现效果,一个简单的界面中,我们只要输入内容,就能够得到内容对应的情感分析:
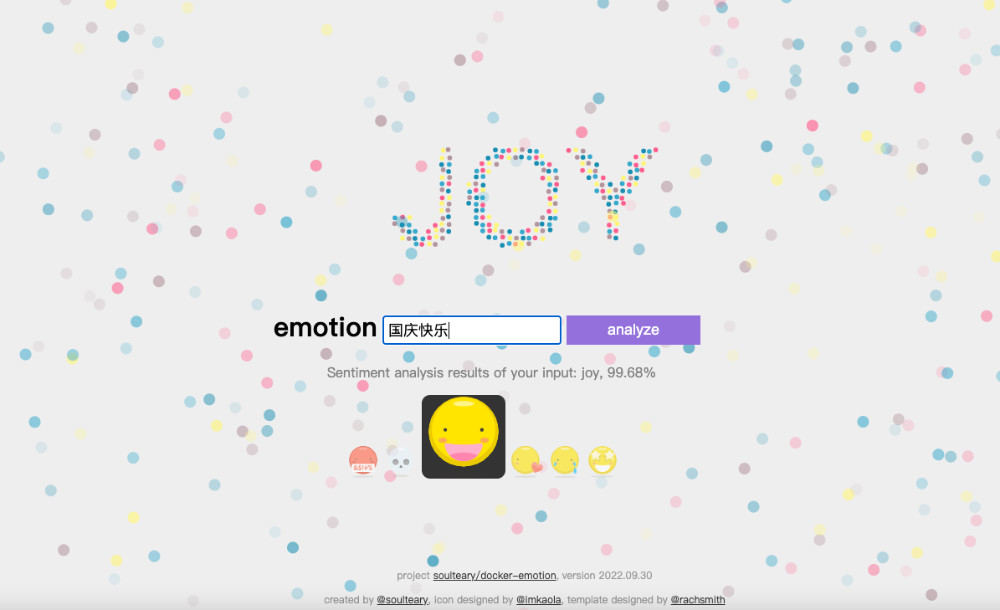
当然,因为我选择的模型是预训练模型,考虑到资源消耗,也并没有使用参数量更大的大模型,所以精度和分类不见得 100% 准确,不过经过测试,多数情况下,这个应用是能够满足我后续文章的需要的,如果你有更高的要求,可以参考本文进行模型替换,:D
如果你着急想试玩这个应用,可以通过下面的 Docker 命令,快速启动它:
```bash
docker run --rm -it -p 3000:3000 soulteary/emotion:2022.09.30
```
打开浏览器,输入 `http://localhost:3000` ,就能够看到效果啦。
接下来,我们来看看这样的一个应用是如何实现的。
## 第一步:实现基础的文本分析功能
我在 HuggingFace 上找到了一个效果还不错的预训练模型:[bhadresh-savani/bert-base-uncased-emotion](https://huggingface.co/bhadresh-savani/bert-base-uncased-emotion?text=Su+Yang+is+an+interesting+guy)。它是基于“镇站之宝”,上个月下载量有三千三百万之多的 [bert-base-uncased](https://huggingface.co/bert-base-uncased) 基础上优化得出的,这个模型在英文内容的情感分析准确率能够达到 94%,看起来还是比较不错的。
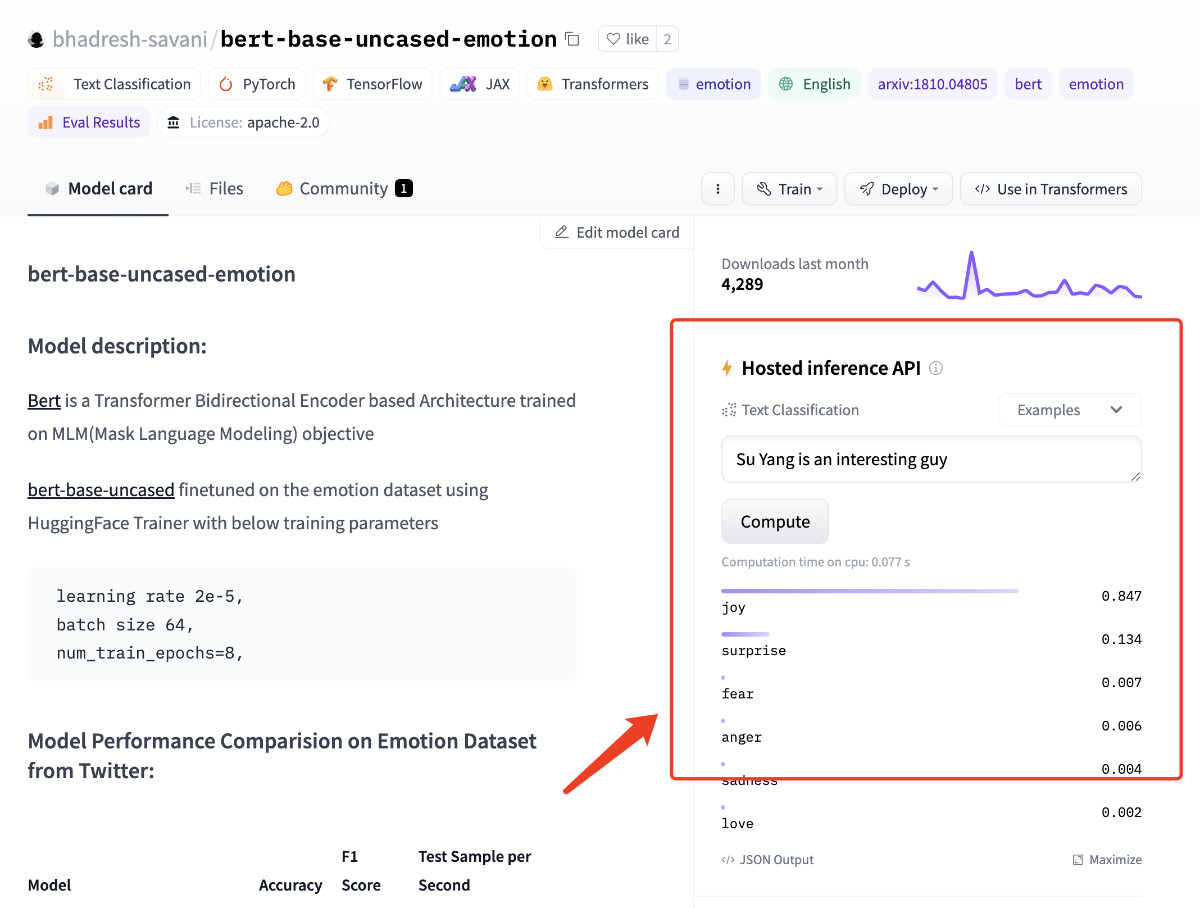
模型论文基于 [Google Research](https://research.google/teams/language/) 团队在 2019 年公开发表的 “[BERT: Pre-training of Deep Bidirectional Transformers for Language Understanding](https://arxiv.org/abs/1810.04805)” 论文实现。在 HuggingFace 的模型仓库里,基于这篇论文的实现[足足有111个之多](https://huggingface.co/models?arxiv=arxiv:1810.04805),侧面说明其靠谱程度。
### 封装文本分析模型的运行容器环境
想要运行这个模型,我们需要先完成基础依赖的安装:`transformers` 和 `torch`,如果你的本地有 PyTorch,可以跳过安装 `torch` 这个依赖的安装。
为了确保读者不论是否有“显卡”都能运行这个程序,这里选择安装小巧的 CPU 版本。你也可以访问 [PyTorch 官方网站](https://pytorch.org/get-started/locally/),选择适合自己的安装方式:
```bash
pip install transformers==4.22.2 && \
pip install torch==1.12.1+cpu --extra-index-url https://download.pytorch.org/whl/cpu
```
我们参考模型项目文档中的例子,不难写出下面的示例代码,来验证“情感分析”功能。测试文本,我们就选择“Good Good Study, Day Day Up”吧 :-D
```python
from transformers import pipeline
classifier = pipeline("text-classification",model='bhadresh-savani/bert-base-uncased-emotion', top_k=1)
prediction = classifier("Good Good Study, Day Day Up", )
print(prediction)
```
将上面的代码保存为 `app.py`,执行 `python app.py`,不出意外,我们将得到类似下面的输出结果,是不是分析情绪结果还挺准的?
```bash
[[{'label': 'joy', 'score': 0.994911253452301}]]
```
在确认模型和程序都没问题之后,我们来封装镜像,确保程序能够在容器中被正常运行。
```bash
FROM python:3.9-slim-buster
LABEL MAINTAINER=soulteary@gmail.com
RUN sed -i -E "s/\w+.debian.org/mirrors.tuna.tsinghua.edu.cn/g" /etc/apt/sources.list
RUN pip config set global.index-url https://pypi.tuna.tsinghua.edu.cn/simple && \
pip3 install --upgrade pip && \
pip install transformers==4.22.2 && \
pip install torch==1.12.1+cpu --extra-index-url https://download.pytorch.org/whl/cpu && \
pip cache purge
RUN python -c "from transformers import pipeline; pipeline('text-classification',model='bhadresh-savani/bert-base-uncased-emotion', top_k=1)" && \
python -c "import transformers; transformers.utils.move_cache()"
WORKDIR /app/
COPY ./docker/bert-base-uncased-emotion/app.py ./
CMD ["python", "app.py"]
```
为了能够让容器中的程序运行更高效,我在容器中添加了一条简单的命令,让程序在容器中先进行“预热”,将需要的模型资源提前下载,保存在镜像中。避免每次运行容器都需要下载几百兆的镜像,浪费时间。
保存好 Dockerfile 之后,执行 `docker build -t soulteary/bert-base-uncased-emotion:2022.09.30 -f docker/bert-base-uncased-emotion/Dockerfile .` ,完成基础运行环境的容器镜像构建。
然后,运行容器验证模型程序是否能够正常运行:
```bash
docker run --rm -it soulteary/bert-base-uncased-emotion:2022.09.30
# 运行结果
[[{'label': 'joy', 'score': 0.994911253452301}]]
```
这部分的完整代码,我上传到了 [soulteary/docker-emotion/docker/bert-base-uncased-emotion](https://github.com/soulteary/docker-emotion/tree/main/docker/bert-base-uncased-emotion),有需要可以自取。
## 第二步:实现基础的文本翻译功能
和上文中挑选情绪分析模型一样,想要实现中文翻译为英文,同样需要先找一个效果还不错的模型。
经过简单的站内搜索,我找到了下面三个模型,为了验证模型效果,我写了一句比较无厘头的测试内容,对这些模型进行测试:“ **张无忌抄起一张板凳,将成昆拍晕了过去。** ”
- [Helsinki-NLP/opus-mt-zh-en](https://huggingface.co/Helsinki-NLP/opus-mt-zh-en)
- 赫尔辛基大学出品,上个月下载量十万+,不过 PyTorch 模型最后更新时间是两年前。
- 直接使用在线页面,测试模型翻译结果:“One unsuspecting copying of a stool will make Quin faint.”
- [K024/mt5-zh-ja-en-trimmed](https://huggingface.co/K024/mt5-zh-ja-en-trimmed)
- 基于谷歌 [google/mt5-base](https://huggingface.co/google/mt5-base) 微调而来的模型,上个月累计下载量两千四百余次,PyTorch 模型上一次修改是七个月前。
- 经过模型推理得到的翻译结果是:“Zhang took a bench and took Cheng Kun over.”
- [penpen/novel-zh-en](https://huggingface.co/penpen/novel-zh-en)
- 一个项目 ReadME 目前还是“三无”状态的模型,上个月下载量六百余次,PyTorch 模型上一次修改是接近一个月前。
- 翻译结果:“Zhang Wuji picked up a stool and knocked Cheng Kun unconscious.”
在反复测试、对比几次之后,我个人感觉最后一个模型更对我的胃口。那么就基于它来实现应用功能吧。还是先来实现基础的模型能力,“翻译”功能相关的程序。
想要让模型正确运行,我们除了需要安装“情感分析”模型需要的 `transformers` 和 `torch` 之外,还需要安装下面两个依赖:
```bash
pip install pip install sentencepiece==0.1.97 sacremoses==0.0.53
```
还是老样子,简单写几行代码,来完成模型的调用,验证程序是否能够正常运行:
```python
from transformers import pipeline
translator = pipeline("translation", model="penpen/novel-zh-en", max_time=7)
prediction = translator("张无忌抄起一张板凳,将成昆拍晕了过去。", )[0]["translation_text"]
print(prediction)
```
将上面的代码保存为 `app.py`,然后执行 `python app.py`,顺利的情况下,我们将得到下面的结果:
```bash
Zhang Wuji picked up a stool and knocked Cheng Kun unconscious.
```
同样,在确认模型和程序都没问题之后,我们来封装镜像,确保程序能够在容器中被正常运行。
### 封装翻译模型的运行容器环境
我们对之前的模型镜像文件进行简单调整:
```bash
FROM python:3.9-slim-buster
LABEL MAINTAINER=soulteary@gmail.com
RUN sed -i -E "s/\w+.debian.org/mirrors.tuna.tsinghua.edu.cn/g" /etc/apt/sources.list
RUN pip config set global.index-url https://pypi.tuna.tsinghua.edu.cn/simple && \
pip3 install --upgrade pip && \
pip install transformers==4.22.2 sentencepiece==0.1.97 sacremoses==0.0.53 && \
pip install torch==1.12.1+cpu --extra-index-url https://download.pytorch.org/whl/cpu && \
pip cache purge
RUN pip install pip install sentencepiece sacremoses && \
pip cache purge
RUN python -c "from transformers import pipeline; translator = pipeline('translation', model='penpen/novel-zh-en', max_time=7)" && \
python -c "import transformers; transformers.utils.move_cache()"
WORKDIR /app/
COPY ./docker/novel-zh-en/app.py ./
CMD ["python", "app.py"]
```
然后执行 `docker build -t soulteary/novel-zh-en:2022.09.30 -f docker/novel-zh-en/Dockerfile .` 构建这个模型的镜像。完成构建之后,我们同样运行一下容器,确保构建的镜像没有问题:
```bash
docker run --rm -it soulteary/novel-zh-en:2022.09.30
# 运行结果
Zhang Wuji picked up a stool and knocked Cheng Kun unconscious.
```
这部分的完整代码,我上传到了 [soulteary/docker-emotion/docker/novel-zh-en](https://github.com/soulteary/docker-emotion/tree/main/docker/novel-zh-en),有需要可以自取。
## 步骤三:初步实现简单的 Web AI 应用
在搞定了核心功能之后,我们来使用偷懒神器 `gradio` (`pip install gradio==3.4.0`),实现一个简单的 Web AI 应用,让刚刚模型的“翻译能力”和“分析能力”组合到一起。
```python
import gradio as gr
from transformers import pipeline
classifier = pipeline("text-classification", model="bhadresh-savani/bert-base-uncased-emotion", top_k=1)
translator = pipeline("translation", model="penpen/novel-zh-en", max_time=7)
def analytics_emo(x):
data = classifier(x)[0]
return data
def predict(text):
translation = ""
split_text = text.splitlines()
for text in split_text:
text = text.strip()
if text:
if len(text) < 512:
sentence = translator(text)[0]["translation_text"] + "\n\n"
translation += sentence
print(split_text)
else:
for i in range(0, len(text), 512):
if i + 512 > len(text):
sentence = translator(text[i:])[0]["translation_text"]
else:
sentence = translator(
text[i: i + 512])[0]["translation_text"]
translation += sentence
return translation
with gr.Blocks() as demo:
gr.Markdown("内容情感分析
一个简单的文本情感分析工具")
with gr.Tab("情感分析"):
with gr.Row():
with gr.Column(scale=1, min_width=600):
translate_input = gr.Textbox(label="文本内容", lines=4, max_lines=100, placeholder="等待分析的文本内容...")
translate_button = gr.Button("翻译")
translate_hidden = gr.State("")
translate_output = gr.Textbox(label="分析结果", lines=4, max_lines=100, placeholder="分析结果...")
analytics_button = gr.Button("一窥究竟")
text_output = gr.Textbox(label="结果", lines=10, max_lines=100, placeholder="分析结果...")
translate_button.click(predict, api_name="translate", inputs=[translate_input], outputs=translate_output)
analytics_button.click(analytics_emo, api_name="analytics", inputs=translate_output, outputs=text_output)
demo.launch(debug=True, server_name="0.0.0.0")
```
代码逻辑比较简单,把前文中的“计算”部分包装为函数,结合 `gradio` 中的 UI 组件调用即可,将代码保存为 `interfaces.py`,然后执行 `python interfaces.py`,等待终端输出日志:
```python
Running on local URL: http://0.0.0.0:7860
To create a public link, set `share=True` in `launch()`.
```
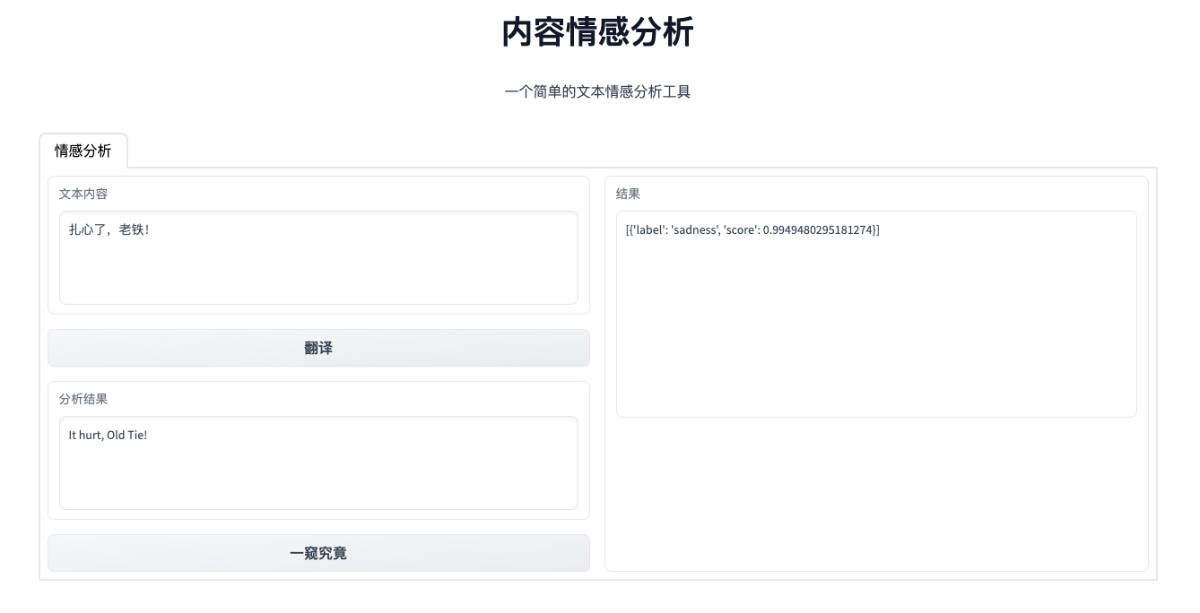
然后打开浏览器,访问 `http://0.0.0.0:7860`,就能够看到下面的界面啦,随便输入点什么,测试下功能。
这部分的完整代码上传到了 [soulteary/docker-emotion/docker/web/interfaces.py](https://github.com/soulteary/docker-emotion/blob/main/docker/web/interfaces.py)。
## 步骤四:优化 Web AI 应用实现
在完成 Web 应用功能验证之后,为了使用体验更好,还有一些需要改善的地方:
- 将两个模型能力完全结合到一起,实现输入中文或英文内容,直接能够分析内容的情感,而不需要先“翻译”后“分析”。
- 应用目前只能够提供 Web 界面访问,如果我们想要通过 API 实现批量数据转换,会比较麻烦。
- 为了使用更简单,我们需要完成最终容器的封装。
我们先来改进程序,让两个模型的能力“完全合体”:
```python
import gradio as gr
from transformers import pipeline
classifier = pipeline("text-classification", model="bhadresh-savani/bert-base-uncased-emotion", top_k=1)
translator = pipeline("translation", model="penpen/novel-zh-en", max_time=7)
def doAnalytics(input):
return classifier(doTranslate(input))[0]
def doTranslate(text):
translation = ""
split_text = text.splitlines()
for text in split_text:
text = text.strip()
if text:
if len(text) < 512:
sentence = translator(text)[0]["translation_text"] + "\n\n"
translation += sentence
print(split_text)
else:
for i in range(0, len(text), 512):
if i + 512 > len(text):
sentence = translator(text[i:])[0]["translation_text"]
else:
sentence = translator(
text[i: i + 512])[0]["translation_text"]
translation += sentence
return translation
with gr.Blocks() as demo:
gr.Markdown("内容情感分析
一个简单的文本情感分析工具")
with gr.Tab("情感分析"):
with gr.Row():
with gr.Column(scale=1, min_width=600):
input = gr.Textbox(label="文本内容", lines=4, max_lines=100, placeholder="等待分析的文本内容...")
with gr.Row():
analytics_button = gr.Button("一窥究竟")
translate_button = gr.Button("翻译内容")
output = gr.Textbox(label="分析结果", lines=4, max_lines=100, placeholder="分析结果...")
analytics_button.click(doAnalytics, api_name="analytics", inputs=[input], outputs=output)
translate_button.click(doTranslate, api_name="translate", inputs=[input], outputs=output)
demo.launch(debug=True, server_name="0.0.0.0")
```
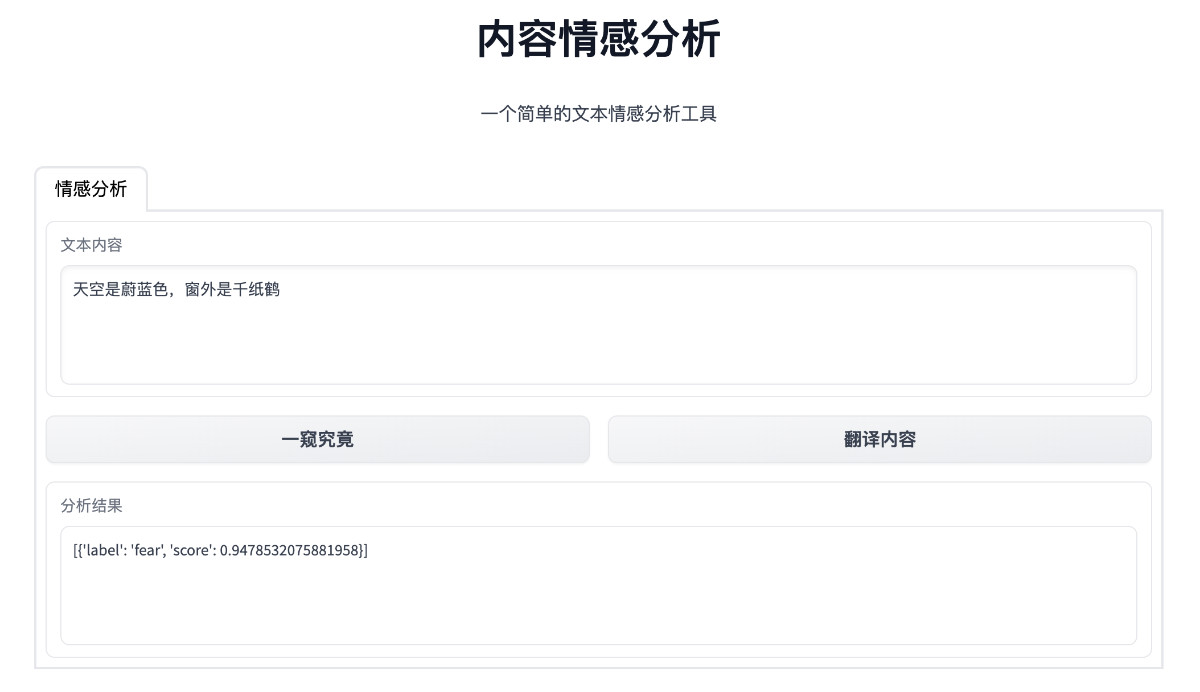
将上面的内容保存为 `app.py` 之后,执行 `python app.py`,来验证程序。等待程序运行完毕,访问 `http://0.0.0.0:7860`,就能够看到更清爽简单的界面啦。
想要让应用具备 API 调用能力,最简单的方法是用 `gradio` 提供的 `API` 能力,使用方法很简单,在 UI 组件的字段里添加 `api_name` 指定接口名称即可:
```python
analytics_button.click(doAnalytics, api_name="analytics", inputs=[input], outputs=output)
translate_button.click(doTranslate, api_name="translate", inputs=[input], outputs=output)
```
我们可以参考上面的实现,来完成应用接口的声明,重新使用 `python app.py` 启动应用,就能够使用下面的方式来调用接口,使用不同的模型的能力啦:
```bash
curl http://localhost:7860/api/translate --data-raw '{"data":["扎心"]}' -X POST -H 'Content-Type: application/json'
# 返回结果
# {"data":["It was piercing.\n\n"],"is_generating":false,"duration":0.5533111095428467,"average_duration":0.6110006173451742}
curl http://localhost:7860/api/analytics --data-raw '{"data":["扎心"]}' -X POST -H 'Content-Type: application/json'
# 返回结果
# {"data":["[{'label': 'anger', 'score': 0.8803150057792664}]"],"is_generating":false,"duration":0.6281025409698486,"average_duration":0.61610213915507}%
```
### 封装通用的模型运行基础容器环境
在聊最终应用的封装之前,我们先来看看如何进行更为完整的基础镜像的封装。结合上文的实践,不难看出两个模型的基础运行环境有一部分是完全相同的,所以我们可以得到一个能够让两个模型都正常运行的,相对最小化的基础 Docker 镜像:
```bash
FROM python:3.9-slim-buster
LABEL MAINTAINER=soulteary@gmail.com
RUN sed -i -E "s/\w+.debian.org/mirrors.tuna.tsinghua.edu.cn/g" /etc/apt/sources.list
RUN pip config set global.index-url https://pypi.tuna.tsinghua.edu.cn/simple && \
pip3 install --upgrade pip && \
pip install transformers==4.22.2 sentencepiece==0.1.97 sacremoses==0.0.53 && \
pip install torch==1.12.1+cpu --extra-index-url https://download.pytorch.org/whl/cpu && \
pip cache purge
RUN python -c "from transformers import pipeline; translator = pipeline('translation', model='penpen/novel-zh-en', max_time=7)" && \
python -c "from transformers import pipeline; pipeline('text-classification',model='bhadresh-savani/bert-base-uncased-emotion', top_k=1)" && \
python -c "import transformers; transformers.utils.move_cache()"
WORKDIR /app/
```
将上面的内容保存为 `Dockrfile.base` 之后,执行 `docker build -t soulteary/emotion:base-2022.09.30 -f docker/web/Dockerfile.base .` 就完成了基础环境的构建。
## 步骤四:实现一个漂亮的前端应用
虽然 `gradio` 提供的 Web UI 看起来干净简洁,但是模型分析情感的响应结果是一串 JSON 字符串,终究没有一个更直观的界面看起来直观,用起来舒服。
所以,我用网上的素材进行了调整,实现了一个简单的前端界面。
因为 `gradio` 不能处理复杂的自定义界面,所以我们需要参考上一篇文章《向量数据库入坑:使用 Docker 和 Milvus 快速构建本地轻量图片搜索引擎》中,“[使用 Golang 实现小而强大的应用网关](https://soulteary.com/2022/09/24/use-docker-and-milvus-to-quickly-build-a-local-lightweight-image-search-engine.html#%E4%BD%BF%E7%94%A8-golang-%E5%AE%9E%E7%8E%B0%E5%B0%8F%E8%80%8C%E5%BC%BA%E5%A4%A7%E7%9A%84%E5%BA%94%E7%94%A8%E7%BD%91%E5%85%B3)”的方式,来完成一个简单的 Web 服务,让用户能够通过浏览器访问到这个前端界面,并且能够正确的将需要分析的数据传递给 `gradio` 启动的服务。
这里包含的内容比较多,就不一一展开了,完整代码可以参考 [soulteary/docker-emotion/docker/ui](https://github.com/soulteary/docker-emotion/tree/main/docker/ui) 这里,具体的技巧,在上一篇文章中有提,如果还不熟悉的同学可以移步阅读。
在实现完毕“前端界面”和 Go 提供的“前端服务”之后,我们将服务使用容器方式进行构建,就能够实现最终的工具镜像了。
## 步骤五:实现最终应用和容器镜像
为了实现一个“All in One”,开箱即用的容器应用,我选择和上一篇文章中“[在 Docker 容器中配置 supervisor](https://soulteary.com/2022/09/24/use-docker-and-milvus-to-quickly-build-a-local-lightweight-image-search-engine.html#%E5%9C%A8-docker-%E5%AE%B9%E5%99%A8%E4%B8%AD%E9%85%8D%E7%BD%AE-supervisor)”所述一样,使用 supervisor 来进行最终容器的构建。
```bash
FROM soulteary/emotion:ui-2022.09.30 AS WEBUI
FROM soulteary/emotion:base-2022.09.30
LABEL MAINTAINER=soulteary@gmail.com
RUN pip install gradio==3.4.0 && \
pip cache purge
COPY docker/web/*.py ./
CMD ["python", "app.py"]
RUN apt update && apt install supervisor -y && \
apt-get remove --purge -y && rm -rf /var/lib/apt/lists/*
SHELL ["/bin/bash", "-c"]
RUN echo $' \n\
[unix_http_server] \n\
file=/var/run/supervisor.sock \n\
chmod=0700 \n\
[inet_http_server] \n\
port=0.0.0.0:8080 \n\
[supervisord] \n\
nodaemon=true \n\
logfile=/var/log/supervisor/supervisord.log \n\
pidfile=/var/run/supervisord.pid \n\
childlogdir=/var/log/supervisor \n\
[rpcinterface:supervisor] \n\
supervisor.rpcinterface_factory = supervisor.rpcinterface:make_main_rpcinterface \n\
[supervisorctl] \n\
serverurl=unix:///var/run/supervisor.sock \n\
[program:server] \n\
directory=/app \n\
command=python app.py \n\
[program:webui] \n\
command=/app/web \n\
'> /etc/supervisor/supervisord.conf
CMD ["/usr/bin/supervisord","-c","/etc/supervisor/supervisord.conf"]
COPY --from=WEBUI /web /app/web
```
在编写完毕 Dockerfile 之后,我们执行命令 `docker build -t soulteary/emotion:2022.09.30 -f docker/web/Dockerfile .`,片刻之后,就能够得到最终的应用镜像了。接着,我们使用命令启动镜像:
```bash
docker run --rm -it -p 3000:3000 -p 7860:7860 soulteary/emotion:2022.09.30
```
然后,在浏览器中访问 `3000` 端口,就能够看到文章一开始展示的应用界面啦。如果希望了解过程中内容被翻译成了什么样子,可以访问 `7860` 端口,通过 `gradio` 提供的界面来了解模型执行过程中的阶段结果。
## 最后
这篇内容就先写到这里啦,祝大家国庆假期快乐。
--EOF