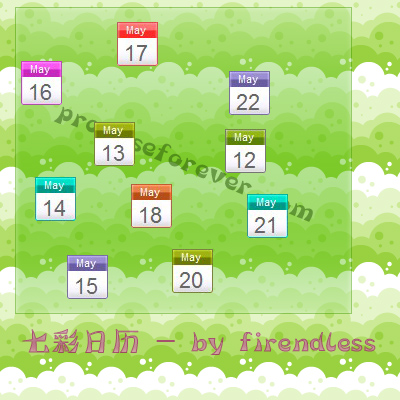
追求个性是博客博主的共同癖好,于是乎,就有了本文,最终实现效果如上~
很多朋友都发现了我的博客文章的左上角有一个小小的日历。实现这个日历很简单,只需要几句CSS代码+PHP代码,外加一张图,实现效果就是下面的小图了。为了回报广大的访客朋友,我升级了一下这个小东西,叫他可以跟随星期而变化,实现的方法有多种,我呢,只选择了一种效率最高的。
如果你对此感兴趣的话,不妨阅读全文。
首先打开你的博客模版,找到出现了下面代码的地方
<div <?php post_class(); ?> id="post-<?php the_ID(); ?>"><h2>
在后面添加下面的代码并将H2标签附近的日期函数删除
<span class="postdate<?php Fir_thePostWeek() ?>"><span class="Mouth"><?php Fir_thePostMouth() ?></span><span class="Day"><?php Fir_thePostDay() ?></span></span>
打开你的style.css,搜索
.post {
在后面添加
/*日历 By soulteary.com*/
.post .postdate1 {height: 46px;width: 43px;background:transparent url(images/more-1.gif) no-repeat scroll 0 -25px;text-align: center;padding: 0px 2px 0 0;line-height: 100%;float: left;}
.post .postdate2 {height: 46px;width: 43px;background:transparent url(images/more-2.gif) no-repeat scroll 0 -25px;text-align: center;padding: 0px 2px 0 0;line-height: 100%;float: left;}
.post .postdate3 {height: 46px;width: 43px;background:transparent url(images/more-3.gif) no-repeat scroll 0 -25px;text-align: center;padding: 0px 2px 0 0;line-height: 100%;float: left;}
.post .postdate4 {height: 46px;width: 43px;background:transparent url(images/more-4.gif) no-repeat scroll 0 -25px;text-align: center;padding: 0px 2px 0 0;line-height: 100%;float: left;}
.post .postdate5 {height: 46px;width: 43px;background:transparent url(images/more-5.gif) no-repeat scroll 0 -25px;text-align: center;padding: 0px 2px 0 0;line-height: 100%;float: left;}
.post .postdate6 {height: 46px;width: 43px;background:transparent url(images/more-6.gif) no-repeat scroll 0 -25px;text-align: center;padding: 0px 2px 0 0;line-height: 100%;float: left;}
.post .postdate0 {height: 46px;width: 43px;background:transparent url(images/more-7.gif) no-repeat scroll 0 -25px;text-align: center;padding: 0px 2px 0 0;line-height: 100%;float: left;}
.post .Mouth {height: 16px;display: block;font: normal 11px Arial, Helvetica, sans-serif;color: #ffffff;text-align: center;padding-top: 2px;margin-left:-2px;}
.post .Day {height: 16px;display: block;font: normal 22px Arial, Helvetica, sans-serif;color: #666666;text-align: center;padding-top: 2px;margin-left:-2px;}
添加完毕,我们继续打开function.php这个文件,在文件末尾的
?>
前添加如下内容
/***
 *Function Name: 输出自定义月份
 *
 *参数说明:
 *是否输出,设定月份
 **/
function Fir_thePostMouth($IfEcho=1,$strTime =0){
//默认为零取得原始月份
 if (empty($strTime)){
 $strTime? = get_post_time('m');
 }

//输出月份
switch ($strTime) {
 case "01":
  $strTime="Jan.";
  break;
 case "02":
  $strTime="Feb.";
  break;
 case "03":
  $strTime="Mar.";
  break;
 case "04":
  $strTime="Apr.";
  break;
 case "05":
  $strTime="May";
  break;
 case "06":
  $strTime="June";
  break;
 case "07":
  $strTime="July";
  break;
 case "08":
  $strTime="Aug.";
  break;
 case "09":
  $strTime="Sept.";
  break;
  case "10":
  $strTime="Oct.";
  break;
  case "11":
  $strTime="Nove.";
  break;
  case "12":
  $strTime="Dec.";
  break;
  default:
  $strTime = $strTime;
  break;
 }
//是否输出
 if (empty($IfEcho)) {
  return $strTime;
 } else {
  echo $strTime;
 }
}
/***
 *Function Name: 输出自定义日期[发布]
 *
 *参数说明:
 *是否输出,如不设置,输出该文件发布日期,如果设置,则输出设置日期
 **/
function Fir_thePostDay($IfEcho=1,$strTime =0){
//判断输出模式
 if (empty($strTime)){
 //获取文章发布时间
  $strTime = get_post_time('d');
 } else {
 //获取当前日期
  $strTime? = $strTime;
 }
//是否输出
 if (empty($IfEcho)) {
  return $strTime;
 } else {
  echo $strTime;
 }
}
/***
 *Function Name: 获取星期[发布]
 *
 *参数说明:
 *是否输出,如不设置,输出该文件发布星期,如果设置,则输出设置星期
 **/
function Fir_thePostWeek($IfEcho=1,$strTime =0){
//判断输出模式
 if (empty($strTime)){
 //获取文章发布时间
  $strTime? = get_post_time('w');
 } else {
 //获取当前日期
  $strTime? = $strTime;
 }
//是否输出
 if (empty($IfEcho)) {
  return $strTime;
 } else {
  echo $strTime;
 }
}
最后一步,将以下图片复制到你的主题的images文件夹内就好了。
images(附件在此~) 如果你有疑问或者建议请在文章后留言~ 以下内容为ZBLOG的相关修改方法。WordPress等PHP Blog的朋友可忽略。 首先打开你的Zblog文件,看到日期显示部分大概样子是
<h4 class="post-date"><#article/posttime/longdate#></h4>
<h4 class="post-date"><#article/posttime#></h4>
然后搜索其中的##内的内容,找到复杂输出日期的函数 发现功能实现文件为c_system_lib.asp 具体实现为
  aryTemplateTagsName(25)="article/posttime/longdate"
  aryTemplateTagsValue(25)=FormatDateTime(PostTime,vbLongDate)
  aryTemplateTagsName(26)="article/posttime/shortdate"
  aryTemplateTagsValue(26)=FormatDateTime(PostTime,vbShortDate)
  aryTemplateTagsName(27)="article/posttime/longtime"
  aryTemplateTagsValue(27)=FormatDateTime(PostTime,vbLongTime)
  aryTemplateTagsName(28)="article/posttime/shorttime"
  aryTemplateTagsValue(28)=FormatDateTime(PostTime,vbShortTime)
  aryTemplateTagsName(29)="article/posttime/year"
  aryTemplateTagsValue(29)=Year(PostTime)
  aryTemplateTagsName(30)="article/posttime/month"
  aryTemplateTagsValue(30)=Month(PostTime)
  aryTemplateTagsName(31)="article/posttime/monthname"
  aryTemplateTagsValue(31)=ZVA_Month(Month(PostTime))
  aryTemplateTagsName(32)="article/posttime/day"
  aryTemplateTagsValue(32)=Day(PostTime)
  aryTemplateTagsName(33)="article/posttime/weekday"
  aryTemplateTagsValue(33)=Weekday(PostTime)
  aryTemplateTagsName(34)="article/posttime/weekdayname"
  aryTemplateTagsValue(34)=ZVA_Week(Weekday(PostTime))
  aryTemplateTagsName(35)="article/posttime/hour"
  aryTemplateTagsValue(35)=Hour(PostTime)
  aryTemplateTagsName(36)="article/posttime/minute"
  aryTemplateTagsValue(36)=Minute(PostTime)
  aryTemplateTagsName(37)="article/posttime/second"
  aryTemplateTagsValue(37)=Second(PostTime)
我们的日历时随着星期变的,所以要搞定星期,顺便解决月份。
aryTemplateTagsValue(30)=Month(PostTime)
将这句使用下面的语句替换
'多叉树生成月份
select case Month(PostTime)
 case 1
 aryTemplateTagsValue(30)="Jan."
 case 2
 aryTemplateTagsValue(30)="Feb."
 case 3
 aryTemplateTagsValue(30)="Mar."
 case 4
 aryTemplateTagsValue(30)="Apr."
 case 5
 aryTemplateTagsValue(30)="May"
 case 6
 aryTemplateTagsValue(30)="June"
 case 7
 aryTemplateTagsValue(30)="July"
 case 8
 aryTemplateTagsValue(30)="Aug."
 case 9
 aryTemplateTagsValue(30)="Sept."
 case 10
 aryTemplateTagsValue(30)="Oct."
 case 11
 aryTemplateTagsValue(30)="Nove."
 case 12
 aryTemplateTagsValue(30)="Dec."
end select
接下来看到这些了吧
  aryTemplateTagsName(33)="article/posttime/weekday"
  aryTemplateTagsValue(33)=Weekday(PostTime)
找到你的所有包含日期的地方 修改为
  <span class="postdate<#article/posttime/weekday#>">
   <span class="Mouth"><#article/posttime/monthname#></span>
   <span class="Day"><#article/posttime/day#></span>
  </span>
欢迎测试~
图片下载[download id=“15”]

