今天的天生一队活动展示了之前大家做的东西,简单的讲了一下手机安装Nodejs(Nodejs on IOS/ Nodejs on Android)。
想了想,这里有一些坑,还是记录下来比较好。
关于我们天生一队做的项目,可以参考GITHUB上的这个repo。
首先展示一下被折腾的主角,两部手机,分别是iPhone 4S 和 小米3。
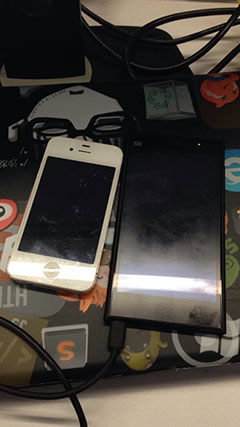
请不要在意手机上的指纹,这些是不重要的细节。
简单说一下手机的概况,iPhone 4S 系统版本为7.04越狱。 使用Terminal作为终端,node有Cydia上现成的包,不过版本很低,只有0.6.0.4,而新版本要求如下:
Prerequisites (Unix only):
- GCC 4.2 or newer
- Python 2.6 or 2.7
- GNU Make 3.81 or newer
- libexecinfo (FreeBSD and OpenBSD only)
经过一番折腾,GCC版本更新到了4.2.1,Make更新到了3.8.1,Python没敢更新,担心影响手机正常运行(刷会非越狱不是我所想啊),libexecinfo 安装不能。 所以ios仅仅可以跑低版本Node支持的API,不过偶尔开个服务器神马的足够用,但是我们的项目需要的最低依赖都是v.0.10…
而且出于活动小组内大家有2-3部米3,所以改变目标为小米3跑Nodejs,这里想到有两种解决方案,一种是直接在Android中跑Nodejs,一种是用手机模拟器来模拟"PC常见的操作系统",然后跑Nodejs。
第一种方案,有可能搞坏手机,毕竟正常时候,手机还是要用来玩和打电话的,关键时刻重启或者挂了就不好了,所以采取第二种方案,并且第一种方案,网上找到的方法多数人都是使用了交叉编译,感觉编译出来的东西放过来可能有风险,于是作罢,采取第二种方案。
而在Android上模拟其他的操作系统,我们一般使用BusyBox来搞,但是除了模拟器外,我们还需要一些对应操作系统的Bootloader脚本来启动模拟器,这里选择了一个叫做Comple的App,他整合了镜像下载,和启动脚本,并且可以自己定义脚本。
这里提供一下工具中的启动脚本,如果有童鞋还想继续完善,可以考虑一下。
bootscript.sh
###########################################
# Linux boot script V7.9 for Android #
# Built by Zachary Powell (zacthespack) #
# and Martin Møller (Tuxling) #
# Thanks to: #
# Johan Vromans #
# Marshall Levin #
# and to everyone at XDA! #
# Feel free to edit/use this script as you#
# like but credit Linuxonandroid.org #
###########################################
# $ver: V7.9 #
###########################################

###########################################
# This is a function we use to stop the #
# script in case of errors #
###########################################
error_exit() {
echo "Error: $1"
exit 1
}

###########################################
# Set up variables #
###########################################
if [ -f /data/data/com.zpwebsites.linuxonandroid/files/busybox ]; then
export bbox=/data/data/com.zpwebsites.linuxonandroid/files/busybox
elif [ -f /data/data/com.zpwebsites.linuxonandroid.opensource/files/busybox ]; then
export bbox=/data/data/com.zpwebsites.linuxonandroid.opensource/files/busybox
else
export bbox=/system/xbin/busybox
fi

export usermounts=android # Base folder all user mounts are done in, should be moved to app later
export imgfile=$(dirname $0)/ubuntu.img # Default image file, another can be set by using an argument
export bin=/system/bin
export mnt=/data/local/mnt
export USER=root
if [[ ! -d $mnt ]]; then mkdir $mnt; fi
export PATH=$bin:/usr/bin:/usr/local/bin:/usr/sbin:/bin:/usr/local/sbin:/usr/games:$PATH
export TERM=linux
export HOME=/root

###########################################
# Handle arguments if present #
###########################################
if [ $# -ne 0 ]; then
if [ -f $1 ]; then # Is full path present?
imgfile=$1

elif [ -f $(dirname $0)/$1 ]; then # Is only a filename present?
imgfile=$(dirname $0)/$1

else
error_exit "Image file not found!($1)"
fi
fi

###########################################
# If a md5 file is found we check it here #
###########################################
if [ -f $imgfile.md5 ]; then
echo "MD5 file found, use to check .img file? (y/n)" read answer
if [ $answer == y ]; then
echo -n "Validating image checksum... "
$bbox md5sum -c -s $imgfile.md5
if [ $? -ne 0 ];then
echo "FAILED!"
error_exit "Checksum failed! The image is corrupted!"
else
echo "OK"
rm $imgfile.md5
fi
fi

fi
################################
# Find and read config file #
# or use defaults if not found #
################################
use_swap=no

cfgfile=$imgfile.config # Default config file if not specified

if [ -f $imgfile.config ]; then
source $imgfile.config
fi

###########################################
# Set Swap up if wanted #
# #
###########################################
if [ $use_swap == yes ]; then
if [ -f $imgfile.swap ]; then
echo "Swap file found, using file"
echo "Turning on swap (if it errors here you do not have swap support"
swapon $imgfile.swap

else
echo "Creating Swap file"
dd if=/dev/zero of=$imgfile.swap bs=1048576 count=1024
mkswap $imgfile.swap
echo "Turning on swap (if it errors here you do not have swap support"
swapon $imgfile.swap

fi
fi
###########################################
# Set up loop device and mount image #
###########################################
echo -n "Checking loop device... "
if [ -b /dev/block/loop255 ]; then
echo "FOUND"
else
echo "MISSING"
# Loop device not found so we create it and verify it was actually created
echo -n "Creating loop device... "
$bbox mknod /dev/block/loop255 b 7 255
if [ -b /dev/block/loop255 ]; then
echo "OK"
else
echo "FAILED"
error_exit "Unable to create loop device!"
fi
fi

$bbox losetup /dev/block/loop255 $imgfile
if [ $? -ne 0 ];then error_exit "Unable to attach image to loop device! (Image = $imgfile)"; fi

$bbox mount -t ext2 /dev/block/loop255 $mnt
if [ $? -ne 0 ];then error_exit "Unable to mount the loop device!"; fi

###########################################
# Mount all required partitions #
###########################################
$bbox mount -t devpts devpts $mnt/dev/pts
if [ $? -ne 0 ];then error_exit "Unable to mount $mnt/dev/pts!"; fi
$bbox mount -t proc proc $mnt/proc
if [ $? -ne 0 ];then error_exit "Unable to mount $mnt/proc!"; fi
$bbox mount -t sysfs sysfs $mnt/sys
if [ $? -ne 0 ];then error_exit "Unable to mount $mnt/sys!"; fi
$bbox mount -o bind /sdcard $mnt/sdcard
if [ $? -ne 0 ];then error_exit "Unable to bind $mnt/sdcard!"; fi

if [[ ! -d $mnt/root/cfg ]]; then mkdir $mnt/root/cfg; fi
$bbox mount -o bind $(dirname $imgfile) $mnt/root/cfg

###########################################
# Checks if you have a external sdcard #
# and mounts it if you do #
###########################################
if [ -d /sdcard/external_sd ]; then
$bbox mount -o bind /sdcard/external_sd $mnt/external_sd
fi
if [ -d /Removable/MicroSD ]; then
$bbox mount -o bind /Removable/MicroSD $mnt/external_sd
fi
# This is for the HD version of the Archos 70 internet tablet, may be the same for the SD card edition but i dont know.
if [ -d /storage ]; then
$bbox mount -o bind /storage $mnt/external_sd
fi

###########################################
# Mount all user defined mounts if any #
###########################################
if [ -f $imgfile.mounts ]; then
olddir=$(pwd)
echo "Mounting user mounts"

cd $mnt
if [[ ! -d $mnt/$usermounts ]]; then $bbox mkdir -p $usermounts; fi

echo "# Script to unmount user defined mounts, do not delete or edit!" > $imgfile.shutdown
echo "cd $mnt/$usermounts" > $imgfile.shutdown

cd $mnt/$usermounts
for entry in $(cat "$imgfile.mounts"); do
ANDROID=${entry%;*}
LINUX=${entry#*;}

if [[ -d $ANDROID ]]; then
echo -n "Mounting $ANDROID to $usermounts/$LINUX... "
if [[ ! -d $mnt/$usermounts/$LINUX ]]; then $bbox mkdir -p $LINUX; fi
$bbox mount -o bind $ANDROID $mnt/$usermounts/$LINUX &> /dev/null
if [ $? -ne 0 ];then
echo FAIL
if [[ -d $mnt/$usermounts/$LINUX ]]; then $bbox rmdir -p $LINUX; fi
else
echo OK
echo "$bbox umount $mnt/$usermounts/$LINUX" >> $imgfile.shutdown
echo "$bbox rmdir -p $LINUX" >> $imgfile.shutdown
fi
else
echo "Android folder not found: $ANDROID"
fi
done
echo "cd $mnt" >> $imgfile.shutdown
echo "$bbox rmdir -p $usermounts" >> $imgfile.shutdown
cd $olddir

else
echo "No user defined mount points"
fi

###########################################
# Sets up network forwarding #
###########################################
$bbox sysctl -w net.ipv4.ip_forward=1
if [ $? -ne 0 ];then error_exit "Unable to forward network!"; fi

# If NOT $mnt/root/DONOTDELETE.txt exists we setup hosts and resolv.conf now
if [ ! -f $mnt/root/DONOTDELETE.txt ]; then
echo "nameserver 8.8.8.8" > $mnt/etc/resolv.conf
if [ $? -ne 0 ];then error_exit "Unable to write resolv.conf file!"; fi
echo "nameserver 8.8.4.4" >> $mnt/etc/resolv.conf
echo "127.0.0.1 localhost" > $mnt/etc/hosts
if [ $? -ne 0 ];then error_exit "Unable to write hosts file!"; fi
fi

###########################################
# Chroot into ubuntu #
###########################################
$bbox chroot $mnt /root/init.sh $(basename $imgfile)

###########################################
# Shut down ubuntu #
###########################################
echo "Shutting down Linux ARM"
#for pid in `lsof | grep $mnt | sed -e's/ / /g' | cut -d' ' -f2`; do kill -9 $pid >/dev/null 2>&1; done
for pid in `$bbox lsof | $bbox grep $mnt | $bbox sed -e's/ / /g' | $bbox cut -d' ' -f2`; do $bbox kill -9 $pid >/dev/null 2>&1; done
sleep 5

###########################################
# Unmount all user defined mounts if any #
###########################################
if [ -f $imgfile.shutdown ]; then
echo "Unmounting user defined mounts"
sh $imgfile.shutdown
rm $imgfile.shutdown
fi

$bbox umount $mnt/root/cfg
$bbox umount $mnt/sdcard
$bbox umount $mnt/external_sd
$bbox umount $mnt/dev/pts
$bbox umount $mnt/dev
$bbox umount $mnt/proc
$bbox umount $mnt/sys
$bbox umount $mnt
$bbox losetup -d /dev/block/loop255 &> /dev/null
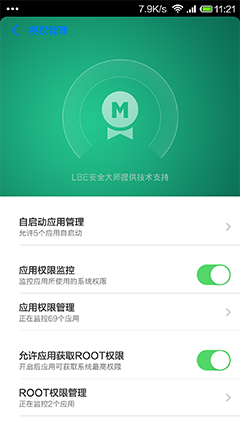
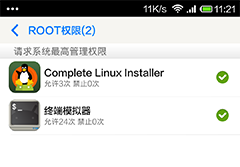
不过在启动模拟器之前,我们需要获取ROOT授权,由于使用的是MIUI的开发版,很容易就可以获取ROOT权限,在安全管理中打开开关。
之后运行终端,以及BUSYBOX,如果成功,会在列表中产生记录。
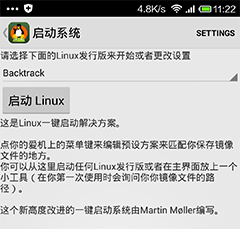
在手机上打开刚刚安装并配置好的Comple应用,选择启动系统,会跳转至手机终端,这里需要注意,启动后会因为提示generic atexit() called from legacy shared library而挂起,请输入y,因为默认脚本没有做容错处理,直接enter或者输入其他会引起脚本启动失败。
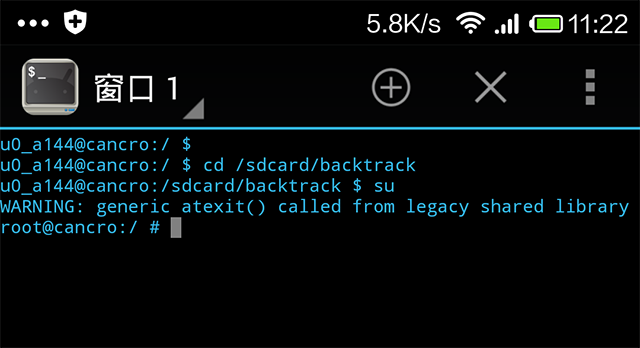
启动的时候,慢点操作,根据自己情况输入即可。
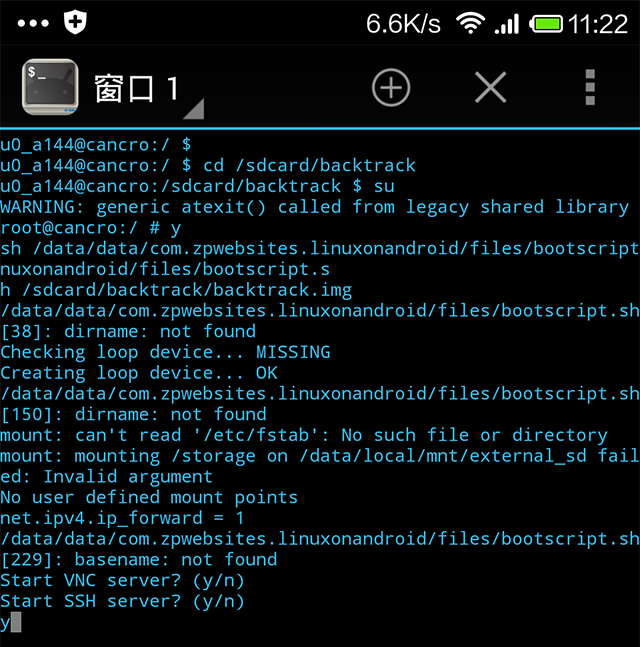
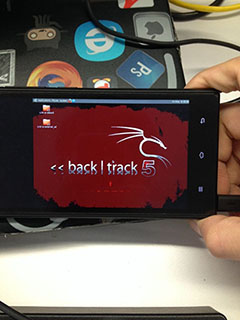
这里展示一张完全搞定的界面。
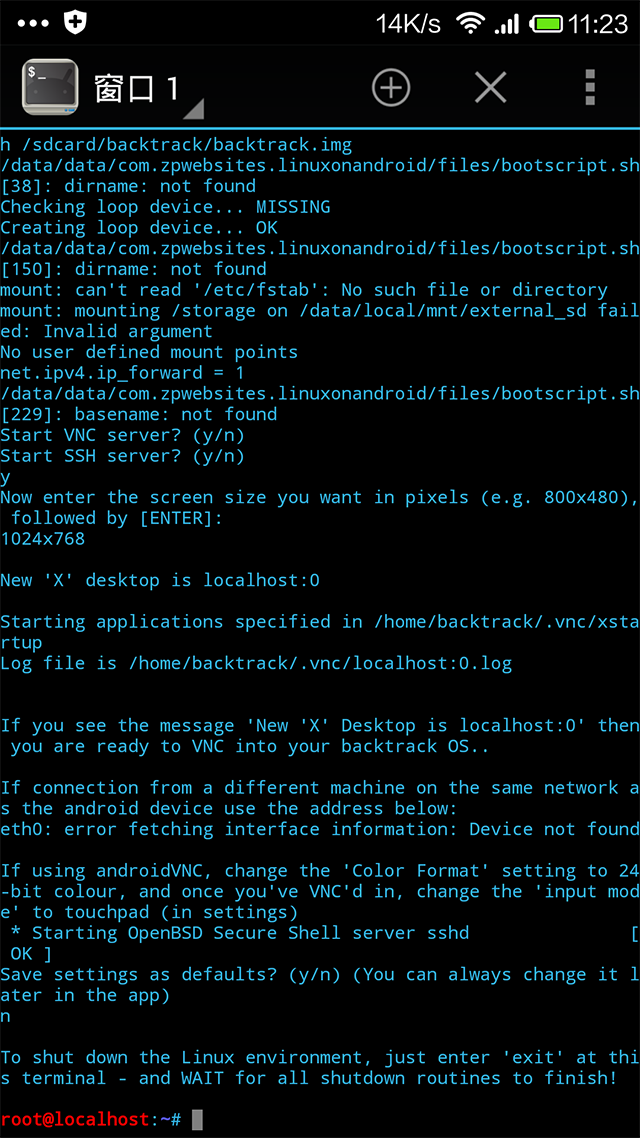
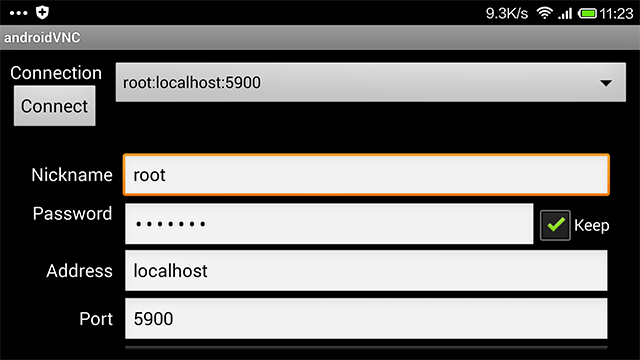
系统启动完成后,我们当然是愉快的用VNC连接并开始安装我们的软件了,VNC的帐号设置,参考之前配置系统安装的时候的设置,如果连接不了,原因可能是:
- 模拟器权限不够,启动失败;
- 刚刚启动脚本乱输入参数,SSH以及VNC有服务器没启动起来;
- 你的系统镜像有问题,安装错误;
- VNC帐号密码有问题。请面壁后挨着检查和重试。
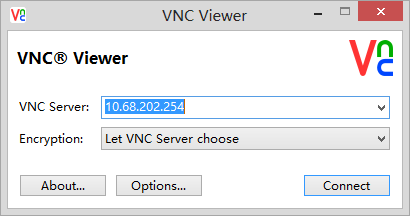
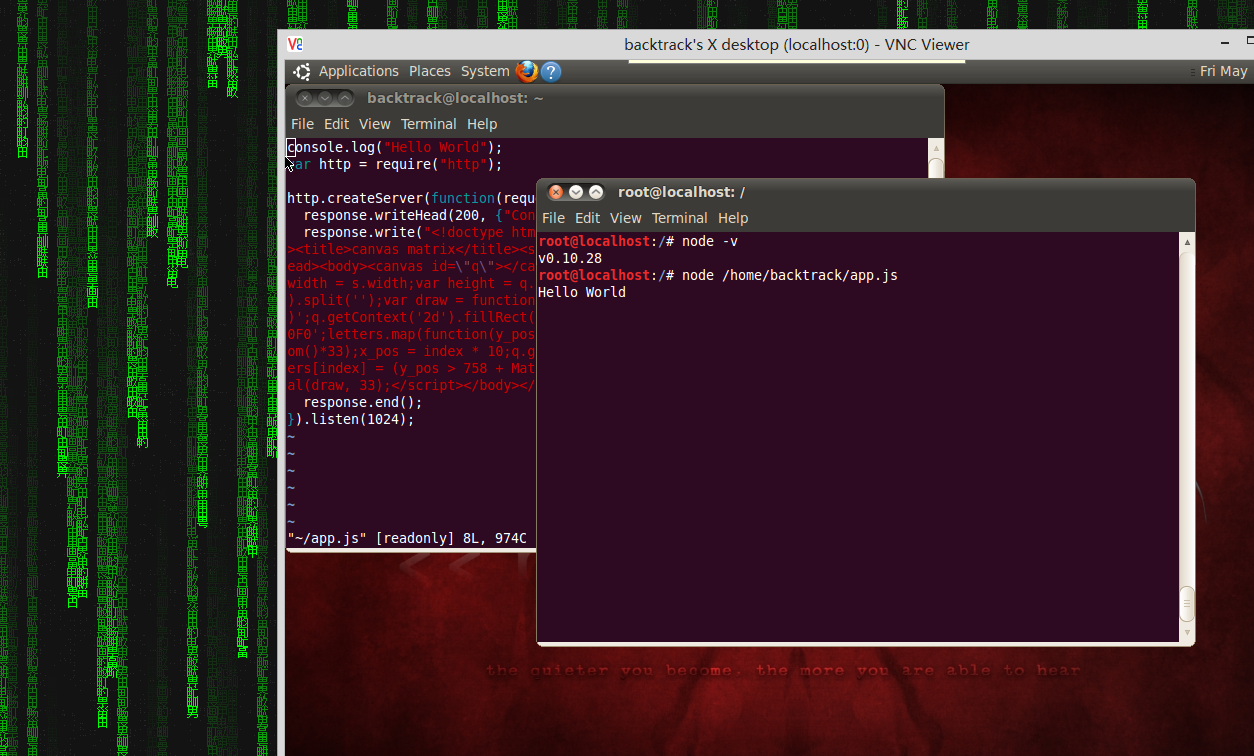
连接好后,就是这个样子了~
当然,因为手机输入效率堪忧,也没有搭配蓝牙键盘…
但是庆幸的是,我们有VNC(当然你要确保上一步你开启了VNC SERVER)…
电脑链接VNC吧,如果你的手机和电脑在同一台路由器或者同一个网段里,很容易的。
接下来就是下载合适的源码包,configure/make/make install等等了。
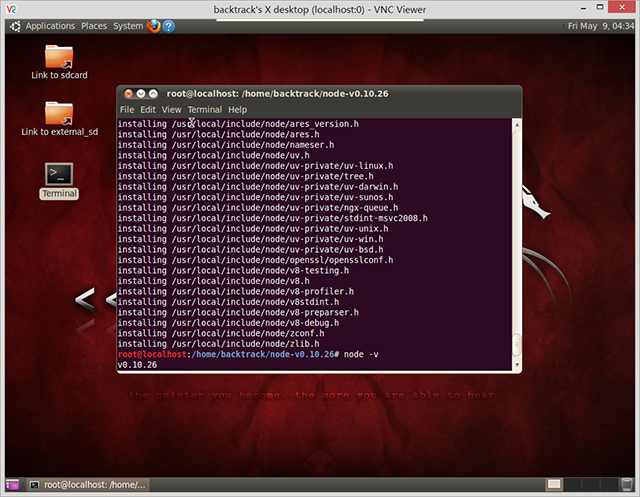
这里额外提一下,编译node的话,需要加参数,–without-snapshot,当然,如果你不需要ssl,也可以 –without-ssl。
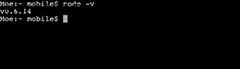
今天展示的时候,再次升级了node的版本,如下图所示。
最后,手机端运行操作系统可以做的事情很多,可以完备运行nodejs的话可以做的事情就更多了,接下来会抽时间看看如何调用手机上的各种设备,扩展一些可能性。
- 试想,当苦逼的在外面的时候,突然需要线上业务维护,这时,口袋里的操作系统或许可以救你一命;(当然希望这个场景不存在)
- 再试想,当苦逼的上下楼窜来窜去聊需求的时候,直接把手机上的应用和demo展示出来,多么轻松;(再轻薄的笔记本也好重,尤其走的多的时候)
- 再试想,当你不需要带着笔记本去公司,仅需要一个蓝牙键盘或者手机扩展键盘 && 显示器+数据线就能搞定业务需求的时候;
- 当然,如果你安装带了许多好玩工具的backtrace的话,能玩的事情就更多了吧。
先写到这里,想到什么再补充吧,感谢阅读,欢迎拍砖。