一直以来因为机器资源捉襟见肘,使用 GitLab CI 配合 compose 完成了多数自动化构建和部署的事情,但是随着运行服务越来越多,管理一大堆 docker-compose.yml 和服务的成本也变的越来越高。
作为一个懒人,购置了一台顶配的 ELite Desk G4 800 来作为资源,计划搭建 K8S 配合 GitLab 的 Auto DevOps 作为接下来使用的方案。
网上关于 K8S 的搭建使用有很多,但是多数都是基于 CentOS、二进制包的教程,太过陈旧和麻烦。
而且在操作过程中,基本都是一路 Next,缺少调试验证,本篇以一个 K8S 新手视角,介绍如何快速搭建一套开发可用的 mini 集群。
我这里计划创建一个单 Master 双子节点的集群。
官方工具箱 Kubeadm
Kubeadm 作为官方推出的 K8S 工具箱,旨在协助开发者能够快速 搭建 和 使用 Kubernetes 的各种核心功能,包括:
- 配置并启动
master节点 - 配置并启动
worker节点,并加入master节点,组成集群 - 升级集群到最新版本
- 管理你的集群的详细配置
- 管理你的集群
token - …
想要了解更多,可以查看官方文档 。
为了简化操作和维护成本,本次集群的搭建就使用它来进行。不过相比较手动配置的灵活,kubeadm 目前存在一些限制,比如它仅支持部分版本的操作系统,参考官方文档:开始安装 kubeadm 之前。
而且每台主机或者虚拟机至少要分配 2核心 和 2GB 的内存。
我这里使用的资源是三台 2核心4GB 的虚拟机,操作系统为 ubuntu ,为了使用 docker 官方的软件包,我将系统版本选择为 16.04。
我在这里对这三台机器分别进行了命名和固定IP分配:
- (Master Node) potato 10.11.12.180
- (Worker Node) potato-chips 10.11.12.181
- (Worker Node) potato-salad 10.11.12.182
配置基础环境
在开始搭建集群之前,我们需要先进行一些基础环境的配置。
SSH 认证授信
接下来的操作,包含大量的 ssh 操作,为了避免麻烦,可以将你的用户秘钥添加到远程主机中。
ssh-copy-id -i ~/.ssh/YOUR_KEY.pub YOUR_HOST_NAME_OR_HOST_IP
完全关闭SWAP交换分区
网上的教程一般都只会引导用户使用 swapoff 命令进行分区关闭,但是一旦主机重启,这个命令的作用就“失效”了,所以这里建议使用我下面提供的命令一劳永逸的完全关闭 swap 分区。
sudo swapoff -a
cat /etc/fstab | grep -v '^#' | grep -v 'swap' | sudo tee /etc/fstab
配置主机名称和基础解析
在建设集群之前,我们需要确保节点之间的以下要素不同:
- 系统主机名不同
- 硬件
product_id - 网卡
MAC地址
我们先设置主机名,比如设置主机名为 potato:
sudo hostnamectl set-hostname potato
设置完主机名称之后,我们需要将主机名称对应的基础解析指向本地。
echo "127.0.0.1 `hostname`" | sudo tee -a /etc/hosts
至于 MAC 地址,你可以直接使用 ifconfig 进行设置,也可以修改 /etc/network/interfaces 进行设置。如果你也是虚拟机用户,我建议直接在硬件层面进行设置,一劳永逸,另外,如果你在硬件层面设置了 MAC 地址,product_id 也会随之变化。
提了这么多次 product_id ,那么该如何查看它的内容呢,很简单:
sudo cat /sys/class/dmi/id/product_uuid
安装docker
在安装 K8S 和各种 K8S TOOLBOX 之前,我们需要先对系统进行一些基础配置,在之前的文章中,我有介绍过如何更优雅的安装 docker。
但是这里稍稍有一些不同:这里必须使用指定版本的 docker-ce ,目前 18.0x 的 docker-ce 暂时未通过 K8S 测试验证,不能被直接使用。
之前的安装命令 apt install docker-ce 需要被替换为下面的命令来进行指定版本的软件安装:
apt-get update && apt-get install -y docker-ce=$(apt-cache madison docker-ce | grep 17.03 | head -1 | awk '{print $3}')
为了避免软件在后续维护系统的过程中被误升级,我们可以锁定它的版本:
apt-mark docker-ce
加速 docker-ce 的下载和安装
如果你觉得从官方下载 docker-ce 比较慢,可以在添加了 gpg 秘钥后,将添加软件仓库地址从官方源改为其他镜像源,比如使用下面的命令添加一个新的软件源:
add-apt-repository "deb [arch=amd64] https://mirrors.aliyun.com/docker-ce/linux/ubuntu $(lsb_release -cs) stable"
然后执行前面说到的安装命令,进行更快速的安装。
安装 Kubeadm、Kubectl、Kubelet
这里参考了部分官方文档 Creating a single master cluster with kubeadm ,但是请注意,目前官方已经关闭了 v1 版本的 docker 仓库的接口,所以如果你准备挂代理直接下载软件镜像包,需要修改 /etc/docker/daemon.json,强制停用 v1 版本的 API:
{
  "disable-legacy-registry": true
}
由于 K8S 搭建之后,升级不是很频繁,可以直接使用导入离线的软件包,进行快速的服务搭建和升级,而对机器上的 docker 配置做到使用默认配置不进行改动。
获取镜像并导出为离线镜像包
我们这里使用到的软件包镜像名称列表如下:
k8s.gcr.io/kube-apiserver-amd64:v1.11.3
k8s.gcr.io/kube-controller-manager-amd64:v1.11.3
k8s.gcr.io/kube-scheduler-amd64:v1.11.3
k8s.gcr.io/kube-proxy-amd64:v1.11.3
k8s.gcr.io/pause:3.1
k8s.gcr.io/etcd-amd64:3.2.18
k8s.gcr.io/coredns:1.1.3
k8s.gcr.io/kubernetes-dashboard-amd64:v0.10.0

quay.io/coreos/flannel:v0.10.0-amd64
将列表保存为文件,在可以获取镜像的云机器上,使用下面的命令可以自动将镜像下载并进行导出。
PACKAGES=`cat ./images/11.txt`;

for package in $PACKAGES; do docker pull "$package"; done

docker images | tail -n +2 | grep -v "<none>" | awk '{printf("%s:%s\n", $1, $2)}' | while read IMAGE; do
    echo "find image: $IMAGE"
    filename="$(echo $IMAGE| tr ':' '-' | tr '/' '-').tar"
    echo "save as $filename"
    docker save ${IMAGE} -o $filename
done
然后将下载并导出的 *.tar 镜像包下载到要搭建集群的机器上,使用下面的命令即可批量导入镜像到系统,避免了要为集群机器配置代理等操作。
ls *.tar | xargs -I {} docker load -i {}
上面的脚本,我保存在了 GitHub : soulteary/k8s-images-trans-helper 。
加载 IPVS 内核模块
为了避免 IPVS 内核模块没有加载,而报 RequiredIPVSKernelModulesAvailable 的错误,我们使用下面的命令加载所有支持的 IPVS 模块。
lsmod | grep ^ip_vs | awk '{print $1}' | xargs -I {} modprobe {}
安装 K8S 环境
安装依赖工具、添加 GPG 秘钥、添加软件仓库,进行软件下载:
apt-get update && apt-get install -y apt-transport-https curl
curl -s https://packages.cloud.google.com/apt/doc/apt-key.gpg | apt-key add -
cat <<EOF >/etc/apt/sources.list.d/kubernetes.list
deb http://apt.kubernetes.io/ kubernetes-xenial main
EOF
apt-get update
apt-get install -y kubelet kubeadm kubectl
apt-mark hold kubelet kubeadm kubectl
上面的命令是官方文档提供的,实际上你可能会遇到添加 GPG 秘钥出错的情况,并且使用官方源进行下载失败的情况,为此我为你准备了一套适合国内环境使用的命令。
apt-get update && apt-get install -y apt-transport-https curl
cat google-apt-key.gpg | apt-key add -
add-apt-repository "deb [arch=amd64] https://mirrors.aliyun.com/kubernetes/apt/ kubernetes-$(lsb_release -cs) main"
apt update && apt install -y kubelet kubeadm kubectl
这里的 GPG 秘钥可以和离线镜像包一样,使用云主机下载下来,放置于你执行命令的目录,然后使用 cat 命令读取内容,再使用 apt-key 进行添加操作。
和配置 docker 一样,我们需要锁定软件版本,避免“意外”的出现。
apt-mark hold kubelet kubeadm kubectl
如果你网速够快,1分钟之内,你的 K8S 软件包就都就绪了,接下来就能够进行集群的搭建了。
搭建集群
登录服务器,使用 kubeadm init 命令进行 master 节点的初始化,因为我选择使用 flannel 作为组网工具,所以我在初始化命令后面添加了 CIDR 参数。
kubeadm init --apiserver-advertise-address=10.11.12.180 --pod-network-cidr=10.244.0.0/16
启动 Master 节点
这里偷个懒,直接使用 root 用户启动程序:
root@potato:~# kubeadm init --apiserver-advertise-address=10.11.12.180 --pod-network-cidr=10.244.0.0/16
[init] using Kubernetes version: v1.11.3
[preflight] running pre-flight checks
I0926 04:05:02.988136    1074 kernel_validator.go:81] Validating kernel version
I0926 04:05:02.988343    1074 kernel_validator.go:96] Validating kernel config
[preflight/images] Pulling images required for setting up a Kubernetes cluster
[preflight/images] This might take a minute or two, depending on the speed of your internet connection
[preflight/images] You can also perform this action in beforehand using 'kubeadm config images pull'
[kubelet] Writing kubelet environment file with flags to file "/var/lib/kubelet/kubeadm-flags.env"
[kubelet] Writing kubelet configuration to file "/var/lib/kubelet/config.yaml"
[preflight] Activating the kubelet service
[certificates] Generated ca certificate and key.
[certificates] Generated apiserver certificate and key.
[certificates] apiserver serving cert is signed for DNS names [potato kubernetes kubernetes.default kubernetes.default.svc kubernetes.default.svc.cluster.local] and IPs [10.96.0.1 10.11.12.180]
[certificates] Generated apiserver-kubelet-client certificate and key.
[certificates] Generated sa key and public key.
[certificates] Generated front-proxy-ca certificate and key.
[certificates] Generated front-proxy-client certificate and key.
[certificates] Generated etcd/ca certificate and key.
[certificates] Generated etcd/server certificate and key.
[certificates] etcd/server serving cert is signed for DNS names [potato localhost] and IPs [127.0.0.1 ::1]
[certificates] Generated etcd/peer certificate and key.
[certificates] etcd/peer serving cert is signed for DNS names [potato localhost] and IPs [10.11.12.180 127.0.0.1 ::1]
[certificates] Generated etcd/healthcheck-client certificate and key.
[certificates] Generated apiserver-etcd-client certificate and key.
[certificates] valid certificates and keys now exist in "/etc/kubernetes/pki"
[kubeconfig] Wrote KubeConfig file to disk: "/etc/kubernetes/admin.conf"
[kubeconfig] Wrote KubeConfig file to disk: "/etc/kubernetes/kubelet.conf"
[kubeconfig] Wrote KubeConfig file to disk: "/etc/kubernetes/controller-manager.conf"
[kubeconfig] Wrote KubeConfig file to disk: "/etc/kubernetes/scheduler.conf"
[controlplane] wrote Static Pod manifest for component kube-apiserver to "/etc/kubernetes/manifests/kube-apiserver.yaml"
[controlplane] wrote Static Pod manifest for component kube-controller-manager to "/etc/kubernetes/manifests/kube-controller-manager.yaml"
[controlplane] wrote Static Pod manifest for component kube-scheduler to "/etc/kubernetes/manifests/kube-scheduler.yaml"
[etcd] Wrote Static Pod manifest for a local etcd instance to "/etc/kubernetes/manifests/etcd.yaml"
[init] waiting for the kubelet to boot up the control plane as Static Pods from directory "/etc/kubernetes/manifests"
[init] this might take a minute or longer if the control plane images have to be pulled
[apiclient] All control plane components are healthy after 38.500989 seconds
[uploadconfig] storing the configuration used in ConfigMap "kubeadm-config" in the "kube-system" Namespace
[kubelet] Creating a ConfigMap "kubelet-config-1.11" in namespace kube-system with the configuration for the kubelets in the cluster
[markmaster] Marking the node potato as master by adding the label "node-role.kubernetes.io/master=''"
[markmaster] Marking the node potato as master by adding the taints [node-role.kubernetes.io/master:NoSchedule]
[patchnode] Uploading the CRI Socket information "/var/run/dockershim.sock" to the Node API object "potato" as an annotation
[bootstraptoken] using token: d2y2to.znsihh37rk5calbm
[bootstraptoken] configured RBAC rules to allow Node Bootstrap tokens to post CSRs in order for nodes to get long term certificate credentials
[bootstraptoken] configured RBAC rules to allow the csrapprover controller automatically approve CSRs from a Node Bootstrap Token
[bootstraptoken] configured RBAC rules to allow certificate rotation for all node client certificates in the cluster
[bootstraptoken] creating the "cluster-info" ConfigMap in the "kube-public" namespace
[addons] Applied essential addon: CoreDNS
[addons] Applied essential addon: kube-proxy

Your Kubernetes master has initialized successfully!

To start using your cluster, you need to run the following as a regular user:

  mkdir -p $HOME/.kube
  sudo cp -i /etc/kubernetes/admin.conf $HOME/.kube/config
  sudo chown $(id -u):$(id -g) $HOME/.kube/config

You should now deploy a pod network to the cluster.
Run "kubectl apply -f [podnetwork].yaml" with one of the options listed at:
  https://kubernetes.io/docs/concepts/cluster-administration/addons/

You can now join any number of machines by running the following on each node
as root:

  kubeadm join 10.11.12.180:6443 --token d2y2to.znsihh37rk5calbm --discovery-token-ca-cert-hash sha256:ae980b5c80af45b987b2f3e1d343265f3cce7ef66876cf6a6cabaaa4467868d1

root@potato:~#
这里如果使用 kubectl get nodes ,会出现下面的错误,除非你使用上面输出日志中的命令,对于当前用户进行了配置独立的处理。
root@potato:~# kubectl get nodes
The connection to the server localhost:8080 was refused - did you specify the right host or port?
但是作为一个懒人,我这里直接使用默认配置,执行:
export KUBECONFIG=/etc/kubernetes/admin.conf
然后再次执行刚刚获取 node 节点的命令:
root@potato:~# kubectl get nodes
NAME      STATUS    ROLES     AGE       VERSION
potato    Ready     master    1m        v1.11.3
接着,我可以通过 kubectl get pods 来看看各个组件是否运行正常:
kubectl get pods --namespace=kube-system
root@potato:~# kubectl get pods --namespace=kube-system
NAME                             READY     STATUS    RESTARTS   AGE
coredns-78fcdf6894-2lbvg         0/1       Pending   0          1m
coredns-78fcdf6894-vztcw         0/1       Pending   0          1m
etcd-potato                      1/1       Running   0          26s
kube-apiserver-potato            1/1       Running   0          28s
kube-controller-manager-potato   1/1       Running   0          14s
kube-proxy-qmmwg                 1/1       Running   0          1m
kube-scheduler-potato            1/1       Running   0          11s
全部都是 Running,一切就绪,我们开始进行组网,以及附加集群子节点。
现在 master 节点几乎就绪,我们来配置网络组件:flannel。
Flannel 组网
刚才有提到,我这里使用官方推荐的工具之一: flannel 来进行网络组建。
这里需要先设置 /proc/sys/net/bridge/bridge-nf-call-iptables 为 1,让虚拟网桥上的数据包可以被 iptable 处理。
sysctl net.bridge.bridge-nf-call-iptables=1
至于配置,使用官方推荐的即可,很简单一条命令:
kubectl apply -f https://raw.githubusercontent.com/coreos/flannel/v0.10.0/Documentation/kube-flannel.yml`
执行完毕,你会看到各种 created 的信息。
kubectl apply -f kube-flannel.yml
clusterrole.rbac.authorization.k8s.io/flannel created
clusterrolebinding.rbac.authorization.k8s.io/flannel created
serviceaccount/flannel created
configmap/kube-flannel-cfg created
daemonset.extensions/kube-flannel-ds created
再次查看组件运行状态,我们可以看到,flannel 已经运行起来了:
root@potato:~# kubectl get pods --namespace=kube-system
NAME                             READY     STATUS    RESTARTS   AGE
kube-flannel-ds-7gx48            1/1       Running   0          7s
好了,master 节点现在就就绪了,接下来我们来操作其他的 worker 节点。
添加子节点
下面的操作可以执行无数多遍,我以一台 worker 为例。
在刚刚创建 master 时,命令行输出告诉我们要执行下面的命令,来组建一个集群:
kubeadm join 10.11.12.180:6443 --token d2y2to.znsihh37rk5calbm --discovery-token-ca-cert-hash sha256:ae980b5c80af45b987b2f3e1d343265f3cce7ef66876cf6a6cabaaa4467868d1
如果你的准备工作一项不拉的都执行过了,那么你将会得到下面的输出日志。
[preflight] running pre-flight checks
I0926 04:23:44.001001    4993 kernel_validator.go:81] Validating kernel version
I0926 04:23:44.001206    4993 kernel_validator.go:96] Validating kernel config
[discovery] Trying to connect to API Server "10.11.12.180:6443"
[discovery] Created cluster-info discovery client, requesting info from "https://10.11.12.180:6443"
[discovery] Requesting info from "https://10.11.12.180:6443" again to validate TLS against the pinned public key
[discovery] Cluster info signature and contents are valid and TLS certificate validates against pinned roots, will use API Server "10.11.12.180:6443"
[discovery] Successfully established connection with API Server "10.11.12.180:6443"
[kubelet] Downloading configuration for the kubelet from the "kubelet-config-1.11" ConfigMap in the kube-system namespace
[kubelet] Writing kubelet configuration to file "/var/lib/kubelet/config.yaml"
[kubelet] Writing kubelet environment file with flags to file "/var/lib/kubelet/kubeadm-flags.env"
[preflight] Activating the kubelet service
[tlsbootstrap] Waiting for the kubelet to perform the TLS Bootstrap...
[patchnode] Uploading the CRI Socket information "/var/run/dockershim.sock" to the Node API object "potato-chips" as an annotation

This node has joined the cluster:
* Certificate signing request was sent to master and a response
  was received.
* The Kubelet was informed of the new secure connection details.

Run 'kubectl get nodes' on the master to see this node join the cluster.
嗯,没错,你已经组建了一个最小的集群,一台 master、一台 worker。
为了让我们的集群更像样子,你可以把上面的命令,在其他的机器上继续执行,来给这个集群添加更多的计算资源。
验证集群节点信息
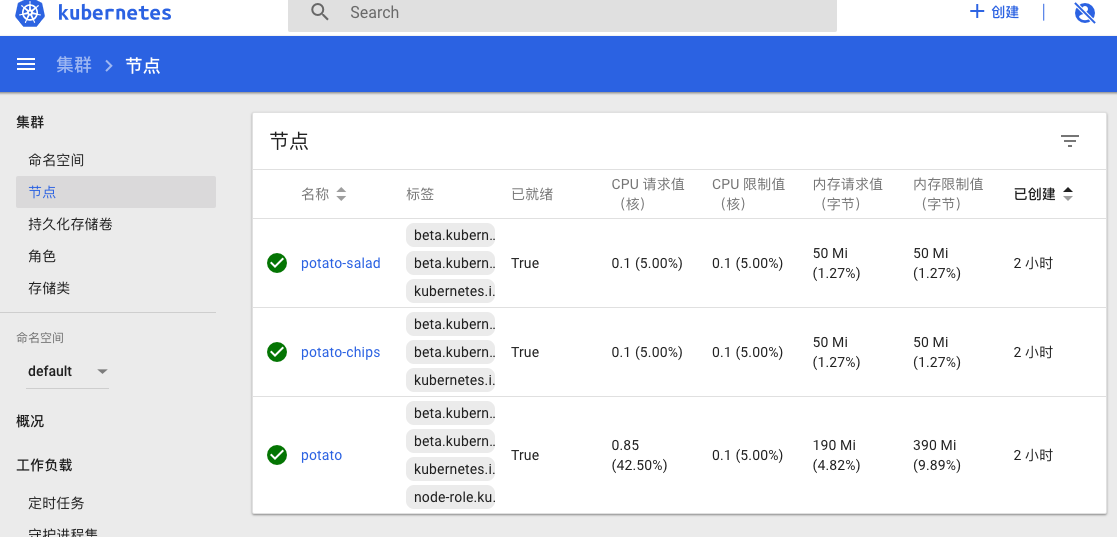
当你在所有节点执行完毕之后,返回 master 节点,还是通过 kubectl get nodes 命令,可以查看到当前集群的信息。
root@potato:~# kubectl get nodes
NAME           STATUS    ROLES     AGE       VERSION
potato         Ready     master    10m       v1.11.3
potato-chips   Ready     <none>    1m        v1.11.3
potato-salad   Ready     <none>    1m        v1.11.3
好了,集群搭建就搞定了。
图形化控制台
总是使用命令行太不“环保”了,作为懒人,我们可以使用官方的 dashboard 插件来进行一些图形化的交互。
搭建图形控制台
和配置 flannel 一样,配置 dashboard 也可以使用官方推荐的配置,一条命令完成操作。
kubectl apply -f https://github.com/kubernetes/dashboard/blob/master/src/deploy/recommended/kubernetes-dashboard.yaml
同样的,如果你上面的集群是就绪的,那么在执行完命令后,也会得到一堆 created 的信息。
root@potato:~# kubectl apply -f kubernetes-dashboard.yaml
secret/kubernetes-dashboard-certs created
serviceaccount/kubernetes-dashboard created
role.rbac.authorization.k8s.io/kubernetes-dashboard-minimal created
rolebinding.rbac.authorization.k8s.io/kubernetes-dashboard-minimal created
deployment.apps/kubernetes-dashboard created
service/kubernetes-dashboard created
使用 kubectl get pods 查看当前 pod 的状况。
root@potato:~# kubectl get pods --namespace=kube-system
NAME                                   READY     STATUS    RESTARTS   AGE
kubernetes-dashboard-767dc7d4d-mw6pv   1/1       Running   0          1m
嗯,一样是就绪状态。
但是由于我们没有安装负载均衡的组件,所以我们暂时无法直接访问 dashboard 以及其他的部署的应用,除了系统组件的应用都被分配了 K8S 的虚拟内网。
我们可以通过 -o wide 参数来查看所有的 pod 分布情况:
root@potato:~# kubectl get pods --namespace=kube-system -o wide
NAME                                   READY     STATUS    RESTARTS   AGE       IP             NODE           NOMINATED NODE
coredns-78fcdf6894-2lbvg               1/1       Running   1          5m        10.244.0.9     potato         <none>
coredns-78fcdf6894-vztcw               1/1       Running   1          5m        10.244.0.10    potato         <none>
etcd-potato                            1/1       Running   1          5m        10.11.12.180   potato         <none>
kube-apiserver-potato                  1/1       Running   1          5m        10.11.12.180   potato         <none>
kube-controller-manager-potato         1/1       Running   1          5m        10.11.12.180   potato         <none>
kube-flannel-ds-7gx48                  1/1       Running   1          5m        10.11.12.180   potato         <none>
kube-flannel-ds-njjrp                  1/1       Running   0          5m        10.11.12.181   potato-chips   <none>
kube-flannel-ds-v4btm                  1/1       Running   0          5m        10.11.12.182   potato-salad   <none>
kube-proxy-bcvx6                       1/1       Running   0          5m        10.11.12.182   potato-salad   <none>
kube-proxy-qmmwg                       1/1       Running   1          5m        10.11.12.180   potato         <none>
kube-proxy-xc5j9                       1/1       Running   0          5m        10.11.12.181   potato-chips   <none>
kube-scheduler-potato                  1/1       Running   1          5m        10.11.12.180   potato         <none>
kubernetes-dashboard-767dc7d4d-mw6pv   1/1       Running   0          5m        10.244.2.10    potato-salad   <none>
让控制台允许访问
网上有很多教程是写在本地如何访问 dashboard 的,所以他们直接使用 kubectl proxy 是有效的,但是如果你是真的搭建一个集群,这时这个命令将会失效,因为它监听的地址是 127.0.0.1。
这时,命令需要修改为:
kubectl proxy --address='0.0.0.0' --accept-hosts='^*$'
然后浏览器中访问:
http://10.11.12.180:8001/api/v1/namespaces/kube-system/services/https:kubernetes-dashboard:/proxy/
即可打开你的 K8S 集群控制台。

如果你和我一样,对 固定IP 进行了域名解析,可以这样使用:
kubectl proxy --address='0.0.0.0' --accept-hosts='^*.lab.com$'
对应的访问地址也就变成了:
http://potato.lab.com:8001/api/v1/namespaces/kube-system/services/https:kubernetes-dashboard:/proxy/#!/login
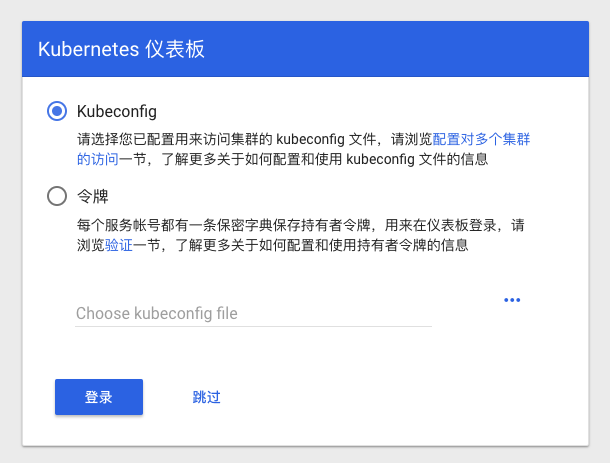
但是这时,你访问这个控制台,会遇到要求输入 KubeConfig 或者 Token 的要求,如果你是相对正式的环境使用,那么不妨阅读 权限控制 相关文档。
当然,如果你真的要使用权限控制方案进行控制台登录,当前版本可能会遇到和社区老兄反馈的一样的问题:
kubectl proxy 对 HTTPS 支持不佳,导致无法登录 dashboard:原文地址。
我个人没有遇到这个问题,因为我使用 Traefik 配合 K8S ,来对外提供域名访问服务,dashboard 我直接使用下面的方案免除了登录权限的认证。
为控制台免除权限认证
作为一个懒人用的开发环境,我这里直接使用官方文档中的 给控制台账号赋予超级用户权限 ,免于配置一大堆内容。
将下面的内容保存为 dashboard-admin.yaml(仅适用于正式发布的版本)
apiVersion: rbac.authorization.k8s.io/v1beta1
kind: ClusterRoleBinding
metadata:
  name: kubernetes-dashboard
  labels:
    k8s-app: kubernetes-dashboard
roleRef:
  apiGroup: rbac.authorization.k8s.io
  kind: ClusterRole
  name: cluster-admin
subjects:
- kind: ServiceAccount
  name: kubernetes-dashboard
  namespace: kube-system
然后和配置 flannel 和 dashboard 一样,使用 kubectl apply 命令执行启动。
root@potato:~# kubectl apply -f dashboard-admin.yaml
clusterrolebinding.rbac.authorization.k8s.io/kubernetes-dashboard created
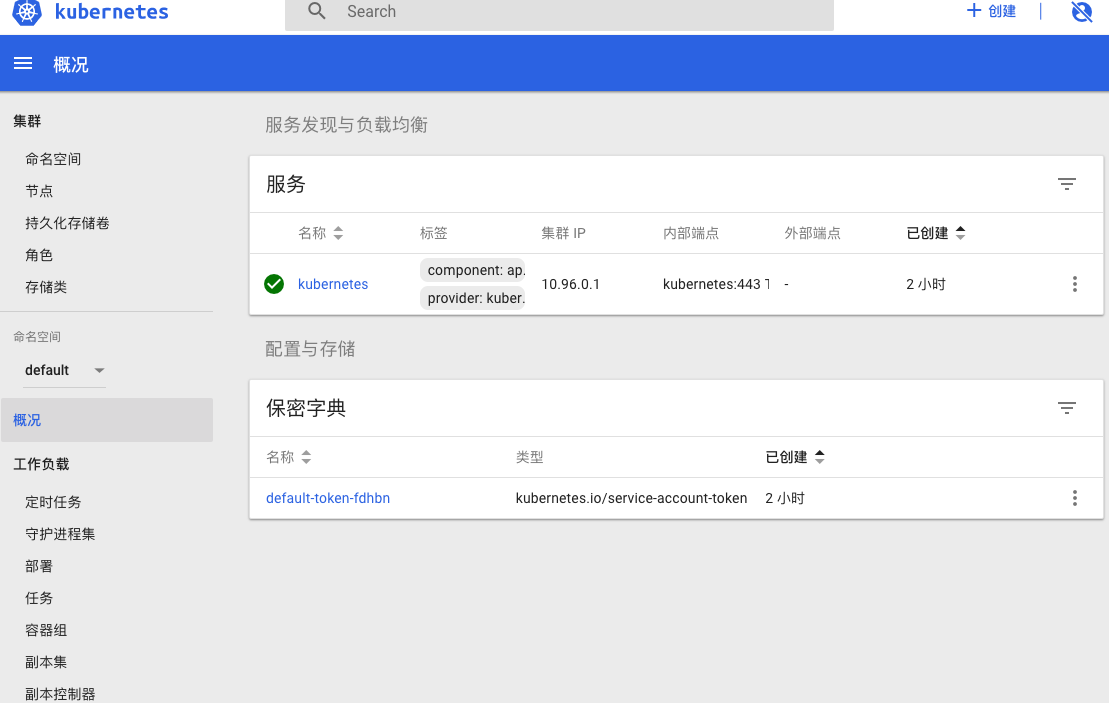
再次执行刚刚的 proxy 命令,刷新你浏览器中的控制台登录页面,点击“跳过”,你便获得了拥有全部权限的控制台。


最后
基础的搭建部分就是这样,是不是很简单。接下来我会写一篇文章介绍如何集成自建 GitLab ,完成开发、构建、发布等常规 Pipeline 。
–EOF