本篇文章是使用 Mastodon 搭建个人信息平台的第一篇内容,我将聊聊在容器环境中搭建 Mastodon 的一些细节。
同时,这篇文章或许你能够找到的为数不多的关于如何在容器环境中搭建和优化 Mastodon 服务的内容。
写在前面
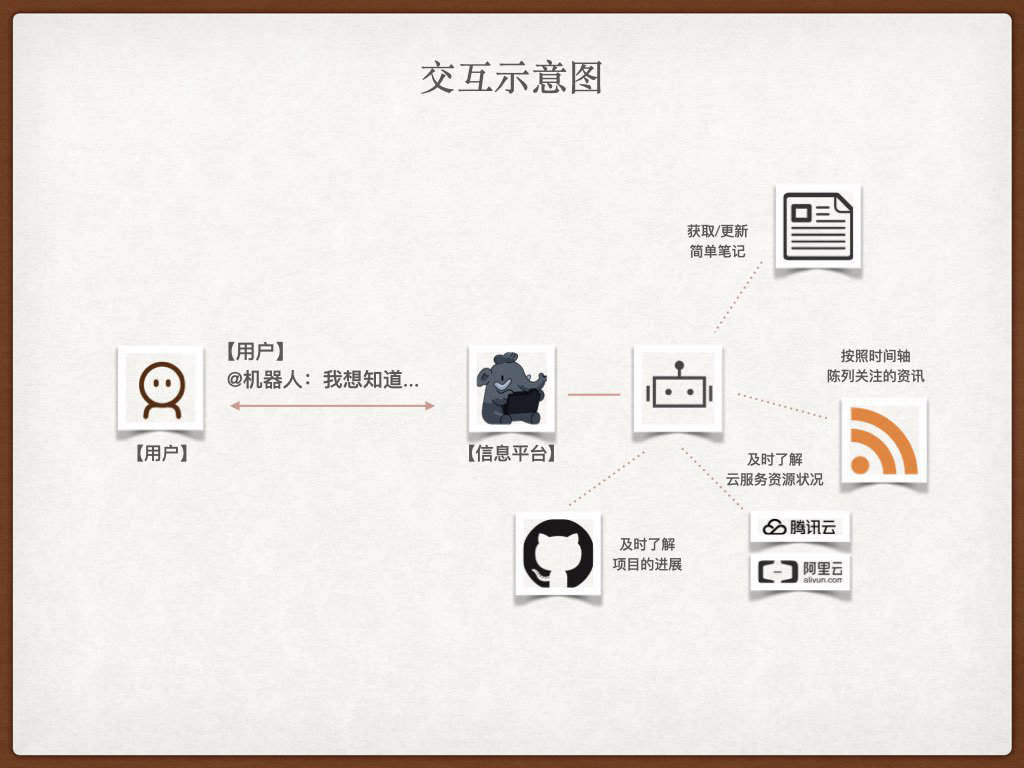
随着折腾的系统越来越多,我开始期望有一个地方能够将这些系统中的消息进行集中的呈现,让我能够快速清晰的了解到有什么有趣的新鲜的、重要的事情发生了,以及让我能够通过更简单的方式对已有系统中的数据进行快速的查询,以及记录一些突然出现的想法。
我认为以时间轴为线索的 Feed 流形式的信息展示,配合和各种“虚拟应用”和 Bot 的对话方式或许能够解决我这个阶段的诉求。交互简单直接、交互操作层级也浅,在多数查询和记录场景下,我只需要输入内容,按下回车就能拿到我想要的数据,而不必打开具体的应用的页面,然后再一步一步、一步一步的操作。
在以往工作和生活中,其实多多少少也有使用过一些包含了交互或者功能和我诉求有交集的工具,比如:在新浪云工作使用的 TeamToy、在淘宝时使用的 Redmine 和阿里门户、美团时使用的大象、之后使用的 Slack、企业微信、学城等等。

不过这类方案多数都是内部或者 SaaS 化的方案,在个人使用场景下,尤其是结合各种 HomeLab 系统,我更希望它是一个私有化的服务。
对于新增“实体”,我比较克制,所以所以在此之前的探索过程中,我对 Phabricator、Confluence 、WordPress、Dokuwiki、Outline 等各种我之前比较熟悉的系统都进行过了一些调查和简单的二次开发,发现虽然能够解决一部分问题,但是交互和体验上总感觉不是那么舒服。因为这些工具或多或少都是基于协作出发,或者基于内容整理出发,而不是信息汇聚和展示。我需要一个即使一个人使用也能很爽的方案。
于是,我开始彻底尝试切换思路,寻找一个上文中提到的,以时间轴为信息展示线索,能够和工具中的 Bot 互动,来记录我的想法、将各种我关注的事件实时汇聚到工具中,能够以简单的命令和方法查询各种系统中已有的数据。最终,我选择了 Mastodon,一个两年前我就已经折腾过一阵的 “Twitter / Weibo Like” 的产品。

在开始折腾之前,我们先来聊聊它的技术架构。
技术架构
Mastodon 的技术架构属于比较经典的 Web 架构,主要的功能组件有:前端应用(React SPA)、应用接口(Ruby Rails6)、推送服务(Node Express + WS)、后台任务(Ruby Sidekiq)、缓存和队列(Redis)、数据库(Postgres),以及可选的全文索引(Elasticsearch 7)构成。
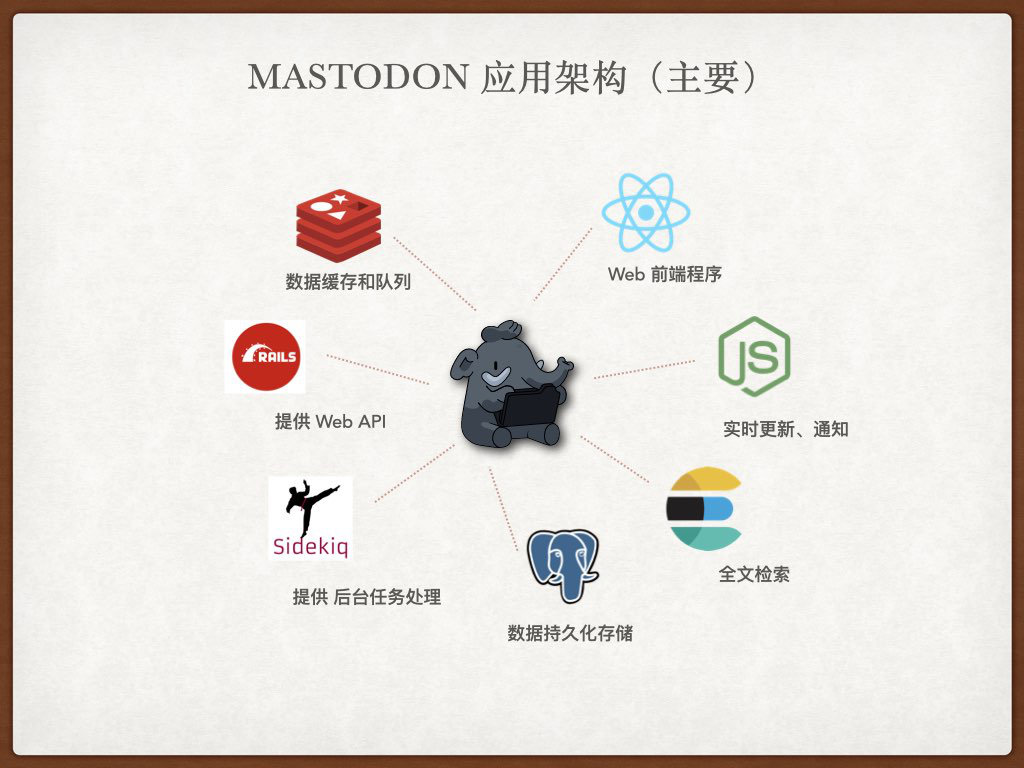
除此之外,支持使用匿名网络通讯的方式和互联网上其他不同的社区实例通讯,交换社区已发布内容,来完成其分布式社区的构想。不过这个功能不在本文范围之内,而且非常简单,就不啰嗦展开了。
基础服务准备
在折腾应用之前,我们先完成应用对于基础服务的依赖设施的搭建。先来聊聊网络规划。
搭建应用网关,进行网络规划
和以往应用一样,我们使用 Traefik 作为服务应用网关,让应用可以使用服务注册的方式动态地接入 Traefik。并且使用 Traefik 提供 SSL 装载、基础的 SSO 鉴权等。
如果你还不了解 Traefik,可以阅读之前的内容进行学习和了解。
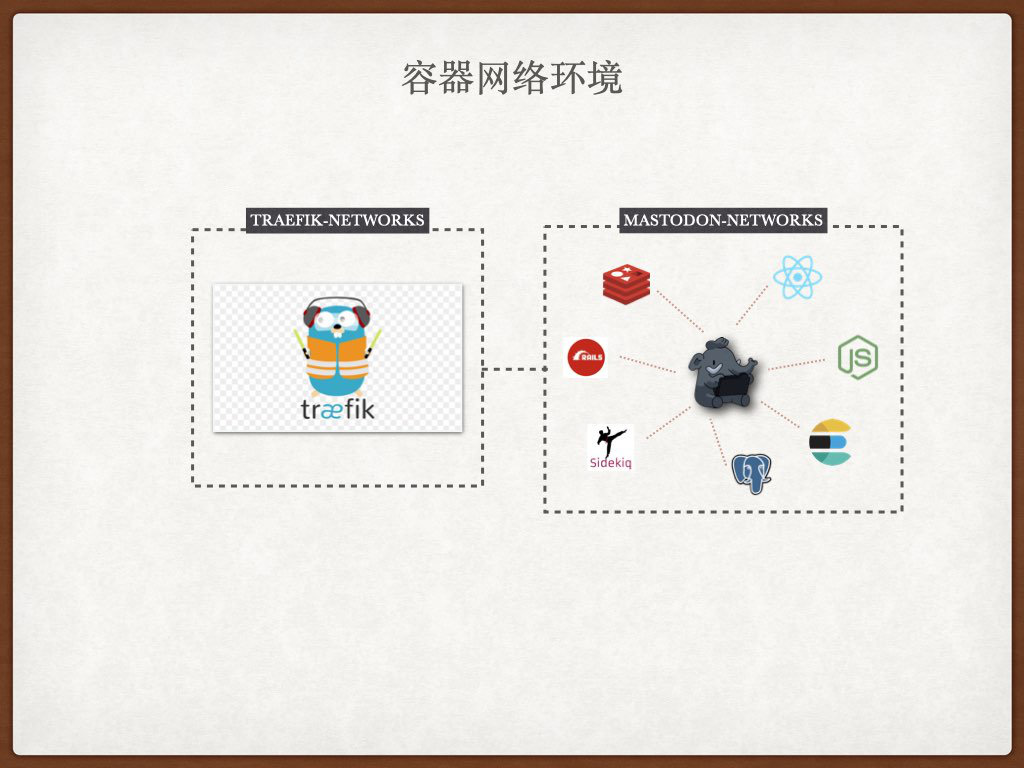
我希望 Mastodon 各个组件在能够通讯、必要的服务能够使用 Traefik 进行服务注册,提供 Web 访问的前提下,还能和主机上其他的容器服务在网络层面相互隔离。
出于上面的考虑,我们可以执行命令,创建一个额外的虚拟网卡进行组件之间的通讯打通:
docker network create mastodon_networks
搭建数据库:Postgres
官方配置文件中,对于数据库的定义是这样的:
version: '3'
services:

  db:
    restart: always
    image: postgres:14-alpine
    shm_size: 256mb
    networks:
      - internal_network
    healthcheck:
      test: ["CMD", "pg_isready", "-U", "postgres"]
    volumes:
      - ./postgres14:/var/lib/postgresql/data
    environment:
      - "POSTGRES_HOST_AUTH_METHOD=trust"
虽然也能使用,但是数据库运行之后,我们会收到程序到一些运行警告。
********************************************************************************
WARNING: POSTGRES_HOST_AUTH_METHOD has been set to "trust". This will allow
         anyone with access to the Postgres port to access your database without
         a password, even if POSTGRES_PASSWORD is set. See PostgreSQL
         documentation about "trust":
         https://www.postgresql.org/docs/current/auth-trust.html
         In Docker's default configuration, this is effectively any other
         container on the same system.

         It is not recommended to use POSTGRES_HOST_AUTH_METHOD=trust. Replace
         it with "-e POSTGRES_PASSWORD=password" instead to set a password in
         "docker run".
********************************************************************************
在应用运行过程中,数据库终端会不断地积累一些请求日志、后台任务执行结果日志输出,最终会产生一个非常大的应用日志文件。在极端的情况下,甚至可能因此将磁盘占满,影响整台服务器上其他应用的正常运行。
所以,我结合实际状况,我对上面的配置做了一些简单调整:
version: '3'
services:

  db:
    restart: always
    image: postgres:14-alpine
    shm_size: 256mb
    networks:
      - mastodon_networks
    healthcheck:
      test: ["CMD", "pg_isready", "-U", "postgres"]
      interval: 15s
      retries: 12
    volumes:
      - /etc/localtime:/etc/localtime:ro
      - /etc/timezone:/etc/timezone:ro
      - ./data:/var/lib/postgresql/data
    environment:
      - "POSTGRES_DB=mastodon"
      - "POSTGRES_USER=mastodon"
      - "POSTGRES_PASSWORD=mastodon"
    logging:
      driver: "json-file"
      options:
        max-size: "10m"

networks:
  mastodon_networks:
    external: true
将上面的内容保存到 postgres 目录的 docker-compose.yml 文件中之后,我们使用 docker-compose up -d 启动服务,稍等片刻,使用 docker-compose ps 查看应用,可以看到服务运行正常。
# docker-compose ps
NAME                COMMAND                  SERVICE             STATUS              PORTS
postgres-db-1       "docker-entrypoint.s…"   db                  running (healthy)   5432/tcp
这部分的配置和代码已经上传至 GitHub,有需要可以自取:https://github.com/soulteary/Home-Network-Note/tree/master/example/mastodon/postgres
搭建缓存和队列服务:Redis
默认的 Redis 启动会在 30秒之后提供服务,对于我们而言有一些久。为了让 Redis 开始提供响应的时间更快,我同样对官方配置中的内容进行了简单的调整:
version: '3'
services:

  redis:
    restart: always
    image: redis:6-alpine
    networks:
      - mastodon_networks
    healthcheck:
      test: ["CMD", "redis-cli", "ping"]
      interval: 15s
      retries: 12
    volumes:
      - /etc/localtime:/etc/localtime:ro
      - /etc/timezone:/etc/timezone:ro
      - ./data:/data
    logging:
      driver: "json-file"
      options:
        max-size: "10m"

networks:
  mastodon_networks:
    external: true
将配置保存到 redis 目录的 docker-compose.yml 后,我们使用 docker-compose up -d 启动服务,稍等片刻,使用 docker-compose ps 查看应用,可以看到服务运行正常。
# docker-compose ps
NAME                COMMAND                  SERVICE             STATUS              PORTS
redis-redis-1       "docker-entrypoint.s…"   redis               running (healthy)   6379/tcp
这部分的配置和代码也已经上传至 GitHub,有需要可以自取:https://github.com/soulteary/Home-Network-Note/tree/master/example/mastodon/redis
搭建全文检索:Elasticsearch
这个组件对于 Mastodon 是可选的,有几个情况下你可能不需要使用 ES:
- 你的机器资源非常紧张,启用 ES 将额外的占用 500MB~1GB 的内存
- 你的站点内容和用户数并不多
- 你的搜索次数非常有限
- 你期望使用资源和性能更高的检索方案
在 2018 年的 PG CONF EU 上,Oleg Bartunov 曾经做过一个分享,关于使用 Postgres 在全文检索场景的使用,感兴趣可以自行了解。
当然,出于对官方选择的尊重,我们还是简单展开一下 ES 的搭建和使用。同样基于官方配置进行简单调整,可以完成一个新的基础编排文件:
version: '3'
services:

  es:
    restart: always
    container_name: es-mastodon
    image: docker.elastic.co/elasticsearch/elasticsearch-oss:7.10.2
    environment:
      - "ES_JAVA_OPTS=-Xms512m -Xmx512m"
      - "cluster.name=es-mastodon"
      - "discovery.type=single-node"
      - "bootstrap.memory_lock=true"
    networks:
      - mastodon_networks
    healthcheck:
      test: ["CMD-SHELL", "curl --silent --fail localhost:9200/_cluster/health || exit 1"]
      interval: 15s
      retries: 12
    volumes:
      - /etc/localtime:/etc/localtime:ro
      - /etc/timezone:/etc/timezone:ro
      - ./data:/usr/share/elasticsearch/data:rw
    ulimits:
      memlock:
        soft: -1
        hard: -1
    logging:
      driver: "json-file"
      options:
        max-size: "10m"

networks:
  mastodon_networks:
    external: true
不过,如果我们将上面的编排文件保存,并尝试启动服务,会遇到一个经典的问题,目录权限不正确,服务无法启动:
"stacktrace": ["org.elasticsearch.bootstrap.StartupException: ElasticsearchException[failed to bind service]; nested: AccessDeniedException[/usr/share/elasticsearch/data/nodes];",
"at org.elasticsearch.bootstrap.Elasticsearch.init(Elasticsearch.java:174) ~[elasticsearch-7.10.2.jar:7.10.2]",
...

ElasticsearchException[failed to bind service]; nested: AccessDeniedException[/usr/share/elasticsearch/data/nodes];
Likely root cause: java.nio.file.AccessDeniedException: /usr/share/elasticsearch/data/nodes
	at java.base/sun.nio.fs.UnixException.translateToIOException(UnixException.java:90)
...
解决问题的方案很简单,我们将数据目录的权限设置为容器内的 ES 进程可操作即可:(强烈不推荐使用简单粗暴的 chmod 777)
mkdir -p data
chown -R 1000:1000 data
docker-compose down && docker-compose up -d
执行完上述命令,重启容器进程之后,再次使用 docker-compose ps 命令查看应用状况,我们可以看到程序运行正常。
# docker-compose ps
NAME                COMMAND                  SERVICE             STATUS              PORTS
es-mastodon         "/tini -- /usr/local…"   es                  running (healthy)   9300/tcp
这部分的配置和代码也已经上传至 GitHub,有需要可以自取: https://github.com/soulteary/Home-Network-Note/tree/master/example/mastodon/elasticsearch
应用搭建
基础服务搭建完毕之后,我们来完成应用的搭建和部署。
应用初始化
为了方便应用初始化,我写了一个简单的编排配置:
version: "3"
services:
  web:
    image: tootsuite/mastodon:v3.4.4
    restart: always
    environment:
      - "RAILS_ENV=production"
    command: bash -c "rm -f /mastodon/tmp/pids/server.pid; tail -f /etc/hosts"
    networks:
      - mastodon_networks

networks:
  mastodon_networks:
    external: true
将上面的内容保存为 docker-compose.init.yml,接着先使用 docker-compose up -d 启动一个 Mastodon 安装就绪的容器备用。
在容器启动之后,我们执行下面的命令启动 Mastodon 安装引导程序:
docker-compose -f docker-compose.init.yml exec web bundle exec rake mastodon:setup
执行完毕上面的命令,会进入交互式命令行,我们忽略掉所有的警告信息,可以得到类似下面的日志(示例,你可以根据自己的情况调整)
Your instance is identified by its domain name. Changing it afterward will break things.
Domain name: hub.lab.com

Single user mode disables registrations and redirects the landing page to your public profile.
Do you want to enable single user mode? yes

Are you using Docker to run Mastodon? Yes

PostgreSQL host: db
PostgreSQL port: 5432
Name of PostgreSQL database: postgres
Name of PostgreSQL user: postgres
Password of PostgreSQL user:
Database configuration works! 🎆

Redis host: redis
Redis port: 6379
Redis password:
Redis configuration works! 🎆

Do you want to store uploaded files on the cloud? No

Do you want to send e-mails from localhost? yes
E-mail address to send e-mails "from": "(Mastodon <notifications@hub.lab.com>)"
Send a test e-mail with this configuration right now? no

This configuration will be written to .env.production
Save configuration? Yes
Below is your configuration, save it to an .env.production file outside Docker:

# Generated with mastodon:setup on 2022-01-24 08:49:51 UTC

# Some variables in this file will be interpreted differently whether you are
# using docker-compose or not.

LOCAL_DOMAIN=hub.lab.com
SINGLE_USER_MODE=true
SECRET_KEY_BASE=ce1111c9cd51305cd680aee4d9c2d6fe71e1ba003ea31cc27bd98792653535d72a13c386d8a7413c28d30d5561f7b18b0e56f0d0e8b107b694443390d4e9a888
OTP_SECRET=bcb50204394bdce54a0783f1ef2e72a998ad2f107a0ee4dc3b61557f5c12b5c76267c0512e3d08b85f668ec054d42cdbbe0a42ded70cbd0a70be70346e666d05
VAPID_PRIVATE_KEY=QzEMwqTatuKGLSI3x4gmFkFsxi2Vqd4taExqQtZMfNM=
VAPID_PUBLIC_KEY=BFBQg5vnT3AOW2TBi7OSSxkr28Zz2VZg7Jv203APIS5rPBOveXxCx34Okur-8Rti_sD07P4-rAgu3iBSsSrsqBE=
DB_HOST=db
DB_PORT=5432
DB_NAME=postgres
DB_USER=postgres
DB_PASS=mastodon
REDIS_HOST=redis
REDIS_PORT=6379
REDIS_PASSWORD=
SMTP_SERVER=localhost
SMTP_PORT=25
SMTP_AUTH_METHOD=none
SMTP_OPENSSL_VERIFY_MODE=none
SMTP_FROM_ADDRESS="Mastodon <notifications@hub.lab.com>"

It is also saved within this container so you can proceed with this wizard.

Now that configuration is saved, the database schema must be loaded.
If the database already exists, this will erase its contents.
Prepare the database now? Yes
Running `RAILS_ENV=production rails db:setup` ...


Database 'postgres' already exists
[strong_migrations] DANGER: No lock timeout set
Done!

All done! You can now power on the Mastodon server 🐘

Do you want to create an admin user straight away? Yes
Username: soulteary
E-mail: soulteary@gmail.com
You can login with the password: 76a17e7e1d52056fdd0fcada9080f474
You can change your password once you login.
在上面的交互程序中,为了节约时间,我选择了不使用外部服务存储文件、不使用外部服务发送邮件,你可以根据自己的需求进行调整。
在命令执行过程中,我们可能会看到一些和 Redis 相关的报错信息:Error connecting to Redis on localhost:6379 (Errno::ECONNREFUSED) 。这是因为我们在启动配置程序,进行应用初始化的时候,并没有预先正确配置 Redis 服务器,这并不说明我们的配置是错误的,只是尚未生效,不必惊慌。
这部分的配置和代码也已经上传至 GitHub,有需要可以自取:https://github.com/soulteary/Home-Network-Note/tree/master/example/mastodon/app
更新应用配置
接下来,我们需要将上面日志输出中和配置有关的信息保存到一个配置文件 .env.production 里。
# Generated with mastodon:setup on 2022-01-24 08:49:51 UTC

# Some variables in this file will be interpreted differently whether you are
# using docker-compose or not.

LOCAL_DOMAIN=hub.lab.com
SINGLE_USER_MODE=true
SECRET_KEY_BASE=ce1111c9cd51305cd680aee4d9c2d6fe71e1ba003ea31cc27bd98792653535d72a13c386d8a7413c28d30d5561f7b18b0e56f0d0e8b107b694443390d4e9a888
OTP_SECRET=bcb50204394bdce54a0783f1ef2e72a998ad2f107a0ee4dc3b61557f5c12b5c76267c0512e3d08b85f668ec054d42cdbbe0a42ded70cbd0a70be70346e666d05
VAPID_PRIVATE_KEY=QzEMwqTatuKGLSI3x4gmFkFsxi2Vqd4taExqQtZMfNM=
VAPID_PUBLIC_KEY=BFBQg5vnT3AOW2TBi7OSSxkr28Zz2VZg7Jv203APIS5rPBOveXxCx34Okur-8Rti_sD07P4-rAgu3iBSsSrsqBE=
DB_HOST=db
DB_PORT=5432
DB_NAME=postgres
DB_USER=postgres
DB_PASS=mastodon
REDIS_HOST=redis
REDIS_PORT=6379
REDIS_PASSWORD=
SMTP_SERVER=localhost
SMTP_PORT=25
SMTP_AUTH_METHOD=none
SMTP_OPENSSL_VERIFY_MODE=none
SMTP_FROM_ADDRESS="Mastodon <notifications@hub.lab.com>"
这里需要注意的一点是,发送邮件通知配置中的 SMTP_FROM_ADDRESS 的内容需要使用双引号包裹,如果在上面交互式终端配置过程中,我们使用回车“一路 Next” 可能会出现生成的配置内容漏加引号的问题。
如果出现了这个问题,手动在保存文件的时候加上引号就行,不需要重新执行命令。
调整应用 Web 服务配置
和之前搭建基础设施和调整配置一样,我们针对官方配置模版进行一个简单的调整,可以得到让服务运行最小的容器编排配置:
version: '3'
services:

  web:
    image: tootsuite/mastodon:v3.4.4
    restart: always
    env_file: .env.production
    environment:
      - "RAILS_ENV=production"
    command: bash -c "rm -f /mastodon/tmp/pids/server.pid; bundle exec rails s -p 3000"
    networks:
      - mastodon_networks
    healthcheck:
     test: ["CMD-SHELL", "wget -q --spider --proxy=off localhost:3000/health || exit 1"]
     interval: 15s
     retries: 12
    volumes:
      - /etc/localtime:/etc/localtime:ro
      - /etc/timezone:/etc/timezone:ro

  streaming:
    image: tootsuite/mastodon:v3.4.4
    env_file: .env.production
    restart: always
    command: node ./streaming
    networks:
      - mastodon_networks
    healthcheck:
      test: ["CMD-SHELL", "wget -q --spider --proxy=off localhost:4000/api/v1/streaming/health || exit 1"]
      interval: 15s
      retries: 12
    volumes:
      - /etc/localtime:/etc/localtime:ro
      - /etc/timezone:/etc/timezone:ro
    environment:
      - "STREAMING_CLUSTER_NUM=1"
      - "NODE_ENV=production"

  sidekiq:
    image: tootsuite/mastodon:v3.4.4
    environment:
      - "RAILS_ENV=production"
    env_file: .env.production
    restart: always
    command: bundle exec sidekiq
    networks:
      - mastodon_networks
    volumes:
      - /etc/localtime:/etc/localtime:ro
      - /etc/timezone:/etc/timezone:ro


networks:
  mastodon_networks:
    external: true
将上面的内容保存后,我们将服务启动。因为此时我们并未映射任何端口到服务器“本地”,所以暂时我们还不能访问这些服务。
为了解决这个问题,我们需要配置 Mastodon 这个应用的前端代理。
配置服务前端代理
服务默认使用 Ruby Puma 作为 Web 服务器、Node Express 提供推送和实时更新。为了解决前端资源跨域问题、以及进一步提升服务性能,我们可以采用 Nginx 对这些服务提供反向代理,将服务聚合在一起,并对其中的静态资源进行一定的缓存。
官方这里有一个默认的模版,https://github.com/mastodon/mastodon/blob/main/dist/nginx.conf,不过这个配置适用于不使用容器、或者应用都运行在容器,Nginx 不使用容器运行的场景。
考虑到我们使用 Traefik 提供动态的服务注册和 SSL 证书挂载,所以这个配置我们需要稍作调整才能使用(仅展示主要改动)。
location / {
  try_files $uri @proxy;
}

location ~ ^/(emoji|packs|system/accounts/avatars|system/media_attachments/files) {
  add_header Cache-Control "public, max-age=31536000, immutable";
  try_files $uri @proxy;
}

location /sw.js {
  add_header Cache-Control "public, max-age=0";
  try_files $uri @proxy;
}

location @proxy {
  proxy_set_header Host $host;
  proxy_set_header X-Real-IP $remote_addr;
  proxy_set_header X-Forwarded-For $proxy_add_x_forwarded_for;
  proxy_set_header X-Forwarded-Proto "https";
  proxy_set_header Proxy "";
  proxy_pass_header Server;

  proxy_pass http://web:3000;
  proxy_buffering on;
  proxy_redirect off;
  proxy_http_version 1.1;
  proxy_set_header Upgrade $http_upgrade;
  proxy_set_header Connection $connection_upgrade;

  proxy_cache CACHE;
  proxy_cache_valid 200 7d;
  proxy_cache_valid 410 24h;
  proxy_cache_use_stale error timeout updating http_500 http_502 http_503 http_504;
  add_header X-Cached $upstream_cache_status;

  tcp_nodelay on;
}

location /api/v1/streaming {
  proxy_set_header Host $host;
  proxy_set_header X-Real-IP $remote_addr;
  proxy_set_header X-Forwarded-For $proxy_add_x_forwarded_for;
  proxy_set_header X-Forwarded-Proto "https";
  proxy_set_header Proxy "";

  proxy_pass http://streaming:4000;
  proxy_buffering off;
  proxy_redirect off;
  proxy_http_version 1.1;
  proxy_set_header Upgrade $http_upgrade;
  proxy_set_header Connection $connection_upgrade;

  tcp_nodelay on;
}
在上面的配置中,Nginx “整合”了我们提到的来自 Ruby 和 Node 的两套 Web 服务,并且针对静态资源做了基础的缓存操作,对于可以缓存的内容做了长达一周的 LRU 缓存。
看到这里,我们的服务似乎能正常的跑起来了。但是,是真的没有问题吗?
应用问题修正和架构调优
当我们将服务运行起来之后,即使应用看上去一切正常,此刻我们会遇到第一个问题。日志里频繁出现“X-Accel-Mapping header missing”的警告提示。
触发这个问题的原因在 https://github.com/mastodon/mastodon/issues/3221 中有被披露,不过社区并没有给出好的解决方案。解决这个问题其实很简单,将静态资源彻底从 Ruby Web 服务中迁出即可:一来可以解决这个问题,二来则可以提升服务整体性能,以及在未来让服务更容易做水平扩展。
同时,当我们尝试上传图片或者视频的时候,你会发现由于容器挂载目录的权限问题,我们始终会得到错误的返回。有的人会使用 chmod 777 大法解决问题,然而这个并不是一个最佳实践:存在潜在的安全问题,并且让你的应用水平扩展的能力变得很差。
当然,还有一些细节问题,我们稍后再处理,先处理以上两个问题。
拆分静态资源服务
提到应用动静资源拆分,在云服务大环境下我们不免会想到 CDN。在 Mastodon 中,应用支持设置 CDN_HOST 来将静态资源拆分到 CDN 服务器。不过多数的服务维护者会采用让 CDN 动态回源的方案来进行实现,在忽略一定程度的数据一致性的前提下,这样的维护成本非常低,无需做任何调整和应用改动。
但是仅仅这样做并解决不了我们在前文中提到的问题(CDN时效到了,还是会回源出触发上面的问题)。并且也不利于私有化部署和使用(有额外的成本,不得不依赖公网服务)。
这里有一个更好的方案是将我们的静态资源重新封装为一个独立的服务运行。
参考以往文章中针对容器进行多阶段构建和优化的内容,很容易可以写出类似下面的 Dockerfile:
FROM tootsuite/mastodon:v3.4.4 AS Builder

FROM nginx:1.21.4-alpine
COPY --from=Builder /opt/mastodon/public /usr/share/nginx/html
使用 docker build -t mastodon-assets . 将 Mastodon 的静态资源和 Nginx 打包为一个新的镜像之后,接着来编写这个服务的容器编排配置:
version: '3'
services:

  mastodon-assets:
    image: mastodon-assets
    restart: always
    networks:
      - traefik
    labels:
      - "traefik.enable=true"
      - "traefik.docker.network=traefik"

      - "traefik.http.middlewares.cors.headers.accessControlAllowMethods=GET,OPTIONS"
      - "traefik.http.middlewares.cors.headers.accessControlAllowHeaders=*"
      - "traefik.http.middlewares.cors.headers.accessControlAllowOriginList=*"
      - "traefik.http.middlewares.cors.headers.accesscontrolmaxage=100"
      - "traefik.http.middlewares.cors.headers.addvaryheader=true"

      - "traefik.http.routers.mastodon-assets-http.middlewares=cors@docker"
      - "traefik.http.routers.mastodon-assets-http.entrypoints=http"
      - "traefik.http.routers.mastodon-assets-http.rule=Host(`hub-assets.lab.com`)"

      - "traefik.http.routers.mastodon-assets-https.middlewares=cors@docker"
      - "traefik.http.routers.mastodon-assets-https.entrypoints=https"
      - "traefik.http.routers.mastodon-assets-https.tls=true"
      - "traefik.http.routers.mastodon-assets-https.rule=Host(`hub-assets.lab.com`)"

      - "traefik.http.services.mastodon-assets-backend.loadbalancer.server.scheme=http"
      - "traefik.http.services.mastodon-assets-backend.loadbalancer.server.port=80"

networks:
  traefik:
    external: true
将上面的内容保存为 docker-compose.yml 之后,使用 docker-compose up -d 启动服务,就将原本使用 Ruby 服务吞吐的静态资源,切换到了使用独立的 Nginx 服务来完成静态资源吞吐的目的了。
当然,为了这个操作能够生效,我们还需要在 .env.production 中添加下面的配置内容:
CDN_HOST=https://hub-assets.lab.com
独立维护上传资源
前文提到过,在默认的容器应用中,程序逻辑是让 Ruby 应用维护和处理我们上传的媒体文件(图片、视频)。这个方案同样不利于服务未来的水平扩展和拆分到合适的机器上运行,一个相对更好的方案是使用 S3 服务来针对用户上传的文件进行管理,让应用接近于无状态运行。
在《装在笔记本里的私有云环境:网络存储篇(上)》和《装在笔记本里的私有云环境:网络存储篇(中)》两篇内容中,我有介绍过如何使用 MinIO 来作为通用的存储网关使用。所以,如何搭建和监控一个私有的 S3 服务,在这里就不再赘述了,这里仅聊聊一些不同之处。
这里我采用的是同机部署,所以服务之间的访问,是通过虚拟网卡来解决的。因为服务都在 Traefik “后面”,所以交互协议也尽可以脱去 HTTPS (让 Mastodon 直接使用容器服务名称访问即可)。
这里有一个小细节,为了服务的正常运行,我们的 S3 Entrypoint 需要使用常见端口,比如 HTTP(80)、HTTPS(443),所以在 MinIO 服务中的运行命令需要调整为:
command: minio server /data --address 0.0.0.0:80 --listeners 1 --console-address 0.0.0.0:9001
但如果我们使用 HTTP 的话,会引出另外一个问题,就是 Mastodon 展示静态资源的时候,会使用 HTTP 协议而不是我们期望的 HTTPS,这会造成在 Web 界面的媒体资源无法展示的问题。(不影响客户端,如何解决限于篇幅,我们将在下篇内容中提到)
此外在 Mastodon 中使用 S3 服务作为文件存储后端,因为 S3 服务默认提供的 URL 路径是 S3_DOMAIN_NAME/S3_BUCKET_NAME,所以我们需要在 S3_ALIAS_HOST 配置中做相同的设置。不过考虑到资源的访问性能和效率问题,我们同样可以启动一个 Nginx 作为 MinIO 的静态资源缓存,并且进一步简化这个配置,让我们直接设置 S3_DOMAIN_NAME 即可,同样会方便我们后续进行程序定制。
先来编写这个服务的编排配置:
version: "3"
services:

  nginx-minio:
    image: nginx:1.21.4-alpine
    restart: always
    networks:
      - traefik
      - mastodon_networks
    volumes:
      - /etc/localtime:/etc/localtime:ro
      - /etc/timezone:/etc/timezone:ro
      - ./nginx.conf:/etc/nginx/conf.d/default.conf
    healthcheck:
      test: ["CMD", "curl", "-f", "http://localhost/health"]
      interval: 15s
      retries: 12
    logging:
      driver: "json-file"
      options:
        max-size: "10m"
    labels:
      - "traefik.enable=true"
      - "traefik.docker.network=traefik"
      - "traefik.http.routers.mastodon-s3-http.entrypoints=http"
      - "traefik.http.routers.mastodon-s3-http.rule=Host(`hub-res.lab.com`)"
      - "traefik.http.routers.mastodon-s3-https.entrypoints=https"
      - "traefik.http.routers.mastodon-s3-https.tls=true"
      - "traefik.http.routers.mastodon-s3-https.rule=Host(`hub-res.lab.com`)"
      - "traefik.http.services.mastodon-s3-backend.loadbalancer.server.scheme=http"
      - "traefik.http.services.mastodon-s3-backend.loadbalancer.server.port=80"

  minio:
    image: ${DOCKER_MINIO_IMAGE_NAME}
    container_name: ${DOCKER_MINIO_HOSTNAME}
    volumes:
      - ./data/minio/data:/data:z
    command: minio server /data --address 0.0.0.0:80 --listeners 1  --console-address 0.0.0.0:9001
    environment:
      - MINIO_ROOT_USER=${MINIO_ROOT_USER}
      - MINIO_ROOT_PASSWORD=${MINIO_ROOT_PASSWORD}
      - MINIO_REGION_NAME=${MINIO_REGION_NAME}
      - MINIO_BROWSER=${MINIO_BROWSER}
      - MINIO_BROWSER_REDIRECT_URL=${MINIO_BROWSER_REDIRECT_URL}
      - MINIO_PROMETHEUS_AUTH_TYPE=public
    restart: always
    networks:
      - traefik
      - mastodon_networks
    labels:
      - "traefik.enable=true"
      - "traefik.docker.network=traefik"
      - "traefik.http.middlewares.minio-gzip.compress=true"
      - "traefik.http.routers.minio-admin.middlewares=minio-gzip"
      - "traefik.http.routers.minio-admin.entrypoints=https"
      - "traefik.http.routers.minio-admin.tls=true"
      - "traefik.http.routers.minio-admin.rule=Host(`${DOCKER_MINIO_ADMIN_DOMAIN}`)"
      - "traefik.http.routers.minio-admin.service=minio-admin-backend"
      - "traefik.http.services.minio-admin-backend.loadbalancer.server.scheme=http"
      - "traefik.http.services.minio-admin-backend.loadbalancer.server.port=9001"
    extra_hosts:
      - "${DOCKER_MINIO_HOSTNAME}:0.0.0.0"
    healthcheck:
      test: ["CMD", "curl", "-f", "http://localhost:80/minio/health/live"]
      interval: 3s
      retries: 12
    logging:
      driver: "json-file"
      options:
        max-size: "10m"

networks:
  mastodon_networks:
    external: true
  traefik:
    external: true
接着来进行 Nginx 的配置编写:
server {
    listen 80;
    server_name localhost;

    keepalive_timeout 70;
    sendfile on;
    client_max_body_size 80m;

    location / {
        proxy_set_header X-Real-IP $remote_addr;
        proxy_set_header X-Forwarded-For $proxy_add_x_forwarded_for;
        proxy_set_header X-Forwarded-Proto $scheme;
        proxy_set_header Host $http_host;

        proxy_connect_timeout 300;
        proxy_http_version 1.1;
        proxy_set_header Connection "";
        chunked_transfer_encoding off;

        proxy_pass http://minio/mastodon/;
    }

    location /health {
        access_log off;
        return 200 "ok";
    }
}
然后是 MinIO 初始化脚本 docker-compose.init.yml 的编写:
version: "3"
services:

  minio-client:
    image: ${DOCKER_MINIO_CLIENT_IMAGE_NAME}
    entrypoint: >
      /bin/sh -c "
      /usr/bin/mc config host rm local;
      /usr/bin/mc config host add --quiet --api s3v4 local http://minio ${MINIO_ROOT_USER} ${MINIO_ROOT_PASSWORD};
      /usr/bin/mc mb --quiet local/${DEFAULT_S3_UPLOAD_BUCKET_NAME}/;
      /usr/bin/mc policy set public local/${DEFAULT_S3_UPLOAD_BUCKET_NAME};
      "
    networks:
      - traefik

networks:
  traefik:
    external: true
最后是 MinIO 运行所需要的基础配置信息 .env:
# == MinIO
# optional: Set a publicly accessible domain name to manage the content stored in Outline

DOCKER_MINIO_IMAGE_NAME=minio/minio:RELEASE.2022-01-08T03-11-54Z
DOCKER_MINIO_HOSTNAME=mastodon-s3-api.lab.com
DOCKER_MINIO_ADMIN_DOMAIN=mastodon-s3.lab.com
MINIO_BROWSER=on
MINIO_BROWSER_REDIRECT_URL=https://${DOCKER_MINIO_ADMIN_DOMAIN}
# Select `Lowercase a-z and numbers` and 16-bit string length https://onlinerandomtools.com/generate-random-string
MINIO_ROOT_USER=6m2lx2ffmbr9ikod
# Select `Lowercase a-z and numbers` and 64-bit string length https://onlinerandomtools.com/generate-random-string
MINIO_ROOT_PASSWORD=2k78fpraq7rs5xlrti5p6cvb767a691h3jqi47ihbu75cx23twkzpok86sf1aw1e
MINIO_REGION_NAME=cn-homelab-1

# == MinIO Client
DOCKER_MINIO_CLIENT_IMAGE_NAME=minio/mc:RELEASE.2022-01-07T06-01-38Z

DEFAULT_S3_UPLOAD_BUCKET_NAME=mastodon
如何启动和使用 MinIO 在之前的文章中有介绍,限于篇幅字数限制,就不做展开了。感兴趣请自行翻阅,相关的代码已经上传至 GitHub https://github.com/soulteary/Home-Network-Note/tree/master/example/mastodon/minio
最终应用配置
好了,将上面的内容稍加整合,再做一些简单的调整,我们便可以得到类似下面的配置啦:
version: '3'
services:

  mastodon-gateway:
    image: nginx:1.21.4-alpine
    restart: always
    networks:
      - traefik
      - mastodon_networks
    volumes:
      - /etc/localtime:/etc/localtime:ro
      - /etc/timezone:/etc/timezone:ro
      - ./nginx.conf:/etc/nginx/nginx.conf
    healthcheck:
      test: ["CMD", "curl", "-f", "http://localhost/health"]
      interval: 15s
      retries: 12
    labels:
      - "traefik.enable=true"
      - "traefik.docker.network=traefik"
      - "traefik.http.routers.mastodon-nginx-http.entrypoints=http"
      - "traefik.http.routers.mastodon-nginx-http.rule=Host(`hub.lab.com`)"
      - "traefik.http.routers.mastodon-nginx-https.entrypoints=https"
      - "traefik.http.routers.mastodon-nginx-https.tls=true"
      - "traefik.http.routers.mastodon-nginx-https.rule=Host(`hub.lab.com`)"
      - "traefik.http.services.mastodon-nginx-backend.loadbalancer.server.scheme=http"
      - "traefik.http.services.mastodon-nginx-backend.loadbalancer.server.port=80"

  web:
    image: tootsuite/mastodon:v3.4.4
    restart: always
    env_file: .env.production
    environment:
      - "RAILS_ENV=production"
    command: bash -c "rm -f /mastodon/tmp/pids/server.pid; bundle exec rails s -p 3000"
    networks:
      - mastodon_networks
    healthcheck:
      test: ["CMD-SHELL", "wget -q --spider --proxy=off localhost:3000/health || exit 1"]
      interval: 15s
      retries: 12
    volumes:
      - /etc/localtime:/etc/localtime:ro
      - /etc/timezone:/etc/timezone:ro

  streaming:
    image: tootsuite/mastodon:v3.4.4
    env_file: .env.production
    restart: always
    command: node ./streaming
    networks:
      - mastodon_networks
    healthcheck:
      test: ["CMD-SHELL", "wget -q --spider --proxy=off localhost:4000/api/v1/streaming/health || exit 1"]
      interval: 15s
      retries: 12
    volumes:
      - /etc/localtime:/etc/localtime:ro
      - /etc/timezone:/etc/timezone:ro
    environment:
      - "STREAMING_CLUSTER_NUM=1"

  sidekiq:
    image: tootsuite/mastodon:v3.4.4
    env_file: .env.production
    restart: always
    command: bundle exec sidekiq
    networks:
      - mastodon_networks
    volumes:
      - /etc/localtime:/etc/localtime:ro
      - /etc/timezone:/etc/timezone:ro

networks:
  mastodon_networks:
    external: true
  traefik:
    external: true
此外,因为我们配置了独立的静态资源服务和文件存储服务,所以需要在 .env.production 中额外添加一些配置:
CDN_HOST=https://hub-assets.lab.com
S3_ENABLED=true
S3_PROTOCOL=http
S3_REGION=cn-homelab-1
S3_ENDPOINT=http://mastodon-s3-api.lab.com
S3_BUCKET=mastodon
AWS_ACCESS_KEY_ID=6m2lx2ffmbr9ikod
AWS_SECRET_ACCESS_KEY=2k78fpraq7rs5xlrti5p6cvb767a691h3jqi47ihbu75cx23twkzpok86sf1aw1e
S3_ALIAS_HOST=hub-res.lab.com
使用熟悉的 docker-compose up -d 启动服务,稍等片刻,我们便能看到正常启动的应用了。
这部分相关的代码,已经上传至 GitHub https://github.com/soulteary/Home-Network-Note/tree/master/example/mastodon/app,有需要自取即可。

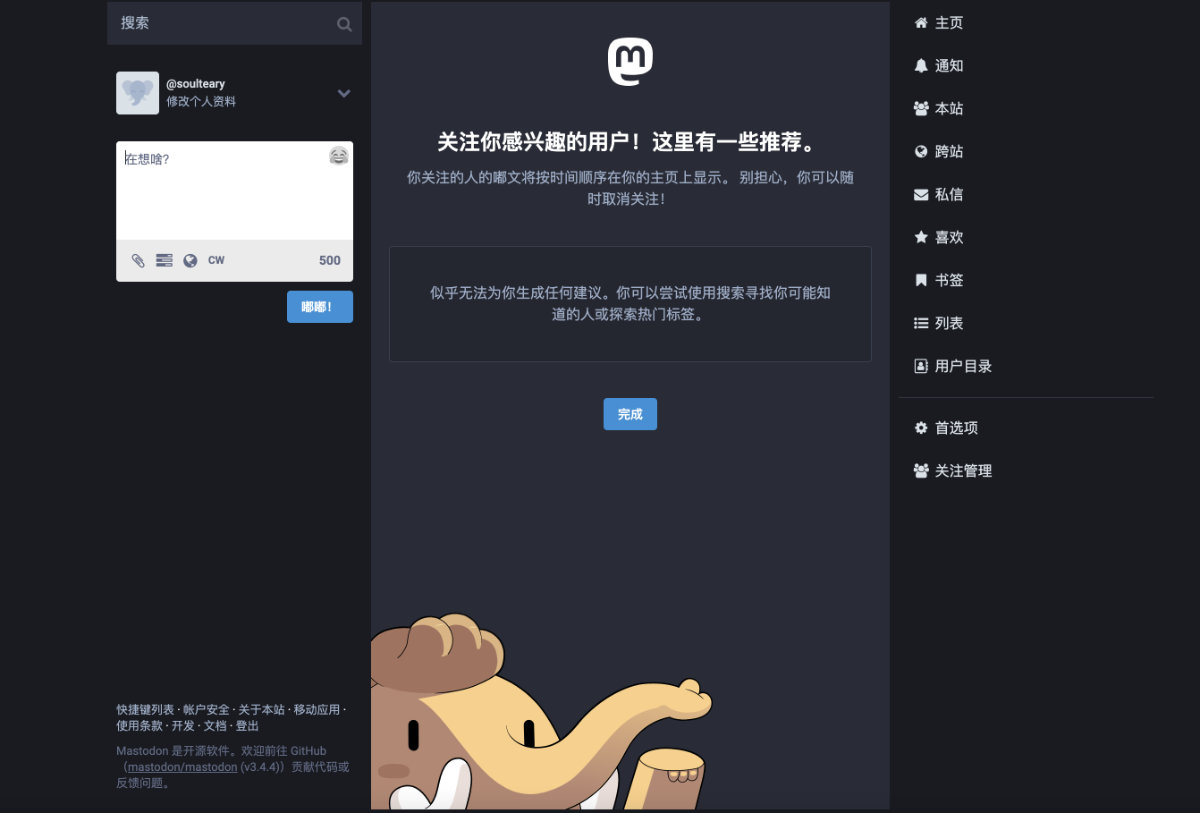
点击登录,使用我们刚刚创建应用配置时的账号邮箱和初始化密码即可完成应用登陆,开始对 Mastodon 的探索啦。
最后
即使一再精简内容,本文的字数也超过了多数平台的长度限制,所以如果你在阅读的过程中发现有一部分缺失,可以尝试阅读原文或者 GitHub 上的完整示例文件来解决问题。
下一篇文章中,我将聊聊如何针对性能进一步做一些调优操作,以及解决本文未解决完的一些问题。
后续将陆续整理和分享一些在知识管理、知识库建设过程中的小经验,希望能帮助到同样对这个领域感兴趣、充满好奇心的你。
–EOF