本篇文章聊聊,如何快速上手 Stable Diffusion XL Turbo 模型的文生图和图生图实战。
写在前面
分享一篇去年 11 月测试过模型,为月末分享的文章做一些技术铺垫,以及使用新的环境进行完整复现。
本篇文章相关的代码保存在 soulteary/docker-stable-diffusion-xl-turbo,有需要可以自取,欢迎“一键三连”。
23 年 11 月末,Stability 将 Stable Diffusion 在 2023 年的速度极限一锤定音,在 SDXL Turbo 上实现了实时生成。
“文生图”战场上,自去年下半年开始,“Stable Diffusion 模型” 开始狂飙,不断产生效率的质变:生成图片的等待时间变的越来越少,生成图片的尺寸和质量越来越好,并且开始往移动端设备上扩展。
- 2023 年 5 月,Nvidia 发布了 “Key-Locked Lora” 方案,将 Lora 模型训练缩减到 4 分钟,每个模型只需要 100KB 大小,并在 SIGGRAPH 2023 发布,可惜代码尚未发布。论文:《Key-Locked Rank One Editing for Text-to-Image Personalization》。
- 2023 年 6 月,Google 一篇 “Speed is all you need”,拉开了新的竞争序幕,在搭载 Android 操作系统的三星手机上,实现了 12 秒生成图片。论文:《Speed Is All You Need: On-Device Acceleration of Large Diffusion Models via GPU-Aware Optimizations》。
- 2023 年 7 月,官方推出了 SDXL 1.0,将竞争维度提升了一档,相比较 SD 模型,尤其是市面上流行的 SD 1.5 而言,质量有大比例提升。论文:《SDXL: Improving Latent Diffusion Models for High-Resolution Image Synthesis》
- 2023 年 10 月,清华学子推出了 LCM,将生成图片推理计算降低到只需要几步,Stable 来到了准实时生成阶段。论文:《Latent Consistency Models: Synthesizing High-Resolution Images with Few-Step Inference》。
- 2023 年 11 月,官方推出了年度最强方案,并发布了 Stable Diffusion XL Turbo,性能比 LCM 进一步提升数倍,实现了实时出图。论文:《Adversarial Diffusion Distillation》。
- 2023 年 11 月末,Google 推出了移动端性能更强的推理方案,在 iPhone 15 Pro 上完成了 0.2 秒出图。论文:《MobileDiffusion: Subsecond Text-to-Image Generation on Mobile Devices》。
虽然,到现在为止,社区还有许多工具停留在 SD 1.5,但是在生成效率(成本)和生成质量的优势下,未来可以预见的是,会有越来越多的模型创作者基于 SDXL Turbo 来创作风格模型。
一起捡起这张船票,扬帆起航。
准备环境
我个人比较倾向使用 Docker 作为运行环境,在投入很少额外资源的情况下,能够快速获得纯净、可复现的一致性非常棒的环境。
如果你选择 Docker 路线,不论你的设备是否有显卡,都可以根据自己的操作系统喜好,参考这两篇来完成基础环境的配置《基于 Docker 的深度学习环境:Windows 篇》、《基于 Docker 的深度学习环境:入门篇》。当然,使用 Docker 之后,你还可以做很多事情,比如:之前几十篇有关 Docker 的实践,在此就不赘述啦。
除此之外,为了高效运行模型,我推荐使用 Nvidia 官方的容器镜像(nvcr.io/nvidia/pytorch:23.12-py3),以及 HuggingFace 出品的 Diffusers 工具包。
我们可以基于上面的内容,快速折腾一个干净、高效的基础运行环境:
FROM nvcr.io/nvidia/pytorch:23.12-py3
RUN pip install transformers==4.36.2 gradio==4.14.0 diffusers==0.25.0 accelerate==0.26.1
WORKDIR /app
你也可以选择使用下面的配置,在安装软件包的时候效率更高:
FROM nvcr.io/nvidia/pytorch:23.12-py3
RUN pip config set global.index-url https://pypi.tuna.tsinghua.edu.cn/simple
RUN pip install transformers==4.36.2 gradio==4.14.0 diffusers==0.25.0 accelerate==0.26.1
WORKDIR /app
在本地创建一个名为 docker 的目录,将上面的代码保存到文件夹内,文件名称为 Dockerfile,然后使用下面的命令完成镜像的构建,基础工作就准备好了一半:
docker build -t soulteary/sdxl-turbo-runtime -f docker/Dockerfile .
当然,如果你和我一样,喜欢“偷懒”,可以用文章开头提到的示例项目中的文件直接开搞:
# 下载项目代码
git clone https://github.com/soulteary/docker-stable-diffusion-xl-turbo.git
# 切换工作目录
cd docker-stable-diffusion-xl-turbo
# 构建基础环境镜像
docker build -t soulteary/sdxl-turbo-runtime -f docker/Dockerfile .
# 如果你希望速度快一些,可以用这条命令替代上面的命令
docker build -t soulteary/sdxl-turbo-runtime -f docker/Dockerfile.cn .
等到镜像构建完毕后,我们开始准备模型文件。
下载模型
我们来完成镜像准备之外的 50% 的准备工作,下载模型。不论你从哪里获取模型,建议你在得到模型后进行文件 Hash 验证:
# shasum stabilityai/sdxl-turbo/sd_xl_turbo_1.0.safetensors
b60babf652bedb03098c03b889293de84a8294f2  stabilityai/sdxl-turbo/sd_xl_turbo_1.0.safetensors

# shasum stabilityai/sdxl-turbo/sd_xl_turbo_1.0_fp16.safetensors
285e9cfa0c674009912559242027b3bc2dceb3f2  stabilityai/sdxl-turbo/sd_xl_turbo_1.0_fp16.safetensors
你可以根据你的实际网络情况,来选择到底是从 HuggingFace 下载模型还是从 ModelScope 来下载模型,如果你选择的是 Model Scope,别忘记在你下载完模型之后,再从 HuggingFace 进行下仓库内容除两个大尺寸模型文件之外的内容更新。
如果你想更快的下载模型,我建议你阅读这篇文章《节省时间:AI 模型靠谱下载方案汇总》,在此就不做展开了。
模型下载好之后,我们可以整理下目录结构,保持 stabilityai/sdxl-turbo 目中有我们下载好的模型就好:
├── docker
│   ├── Dockerfile
│   └── Dockerfile.cn
├── LICENSE
├── README.md
└── stabilityai
    └── sdxl-turbo
        ├── model_index.json
        ├── scheduler
        ├── sd_xl_turbo_1.0_fp16.safetensors
        ├── sd_xl_turbo_1.0.safetensors
        ├── text_encoder
        ├── text_encoder_2
        ├── tokenizer
        ├── tokenizer_2
        ├── unet
        ├── vae
        ├── vae_decoder
        └── vae_encoder
编写模型推理程序
完整的程序文件在这里,算上空格和美观的换行,大概不到 160 多行,我这里再做一些简化,主要讲解下程序的运行流程:
from diffusers import AutoPipelineForImage2Image, AutoPipelineForText2Image
import gradio as gr
from PIL import Image
# ... 省略其他引用
# 加载指定目录的模型
model_name_and_path = "/app/stabilityai/sdxl-turbo"
# 保证乐子,让随机数范围大一些
max_64_bit_int = 2 ** 63 - 1
# ... 省略其他准备工作
# 初始化图生图和文生图两条 AI Pipeline
pipelines = {
"img2img": AutoPipelineForImage2Image.from_pretrained(
model_name_and_path, torch_dtype=torch_dtype, variant="fp16"
),
"txt2img": AutoPipelineForText2Image.from_pretrained(
model_name_and_path, torch_dtype=torch_dtype, variant="fp16"
),
}
...
# 调整上传图片内容的尺寸,模型对处理的图片尺寸有要求
def resize_crop(image: Image, size: int = 512):
# ...省略若干图片调整逻辑,图片模式、尺寸裁剪等等
return image
# 处理输入,生成图片
async def predict(
image: Image,
prompt: str,
strength: float = 0.7,
guidance: float = 0.0,
steps: int = 2,
seed: int = 42,
):
# 如果输入包含图片,那么使用图生图 Pipeline
if image is not None:
# ...
results = pipelines["img2img"](
prompt=prompt,
image=image,
generator=generator,
num_inference_steps=steps,
guidance_scale=guidance,
strength=strength,
width=512,
height=512,
output_type="pil",
)
else:
# 使用文生图 Pipeline
# ...
results = pipelines["txt2img"](
prompt=prompt,
generator=generator,
num_inference_steps=steps,
guidance_scale=guidance,
width=512,
height=512,
output_type="pil",
)
return results.images[0]
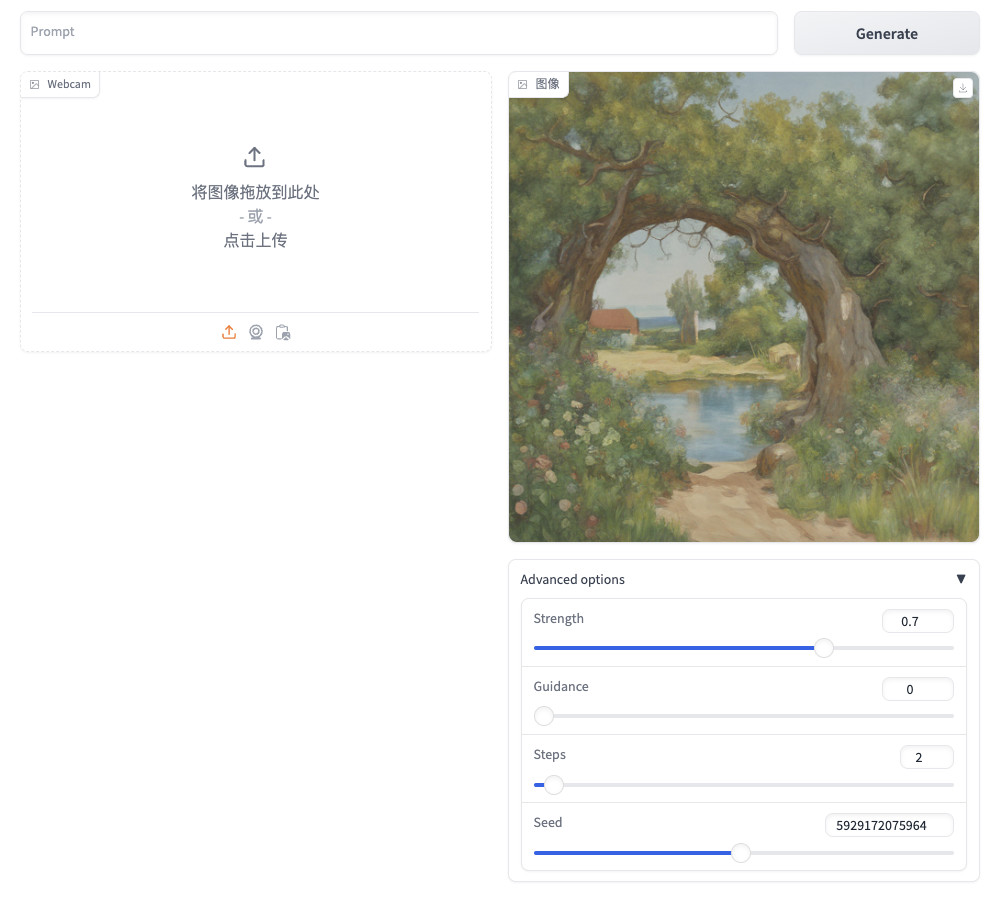
with gr.Blocks() as app:
init_image_state = gr.State()
with gr.Column():
with gr.Row():
prompt = gr.Textbox(placeholder="Prompt", scale=5, container=False)
submit = gr.Button("Generate", scale=1)
with gr.Row():
with gr.Column():
image_input = gr.Image(
sources=["upload", "webcam", "clipboard"],
label="Webcam",
type="pil",
)
with gr.Column():
generated = gr.Image(type="filepath")
with gr.Accordion("Advanced options", open=False):
# 省略 Gradio 界面控件声明
# ...
# 启动服务,允许我们来玩
app.queue()
app.launch(share=False, server_name="0.0.0.0", ssl_verify=False)
准备好程序后,我们将程序放置在目录的根部,然后就可以准备运行开玩了。
├── app.py
├── docker
│   ├── Dockerfile
│   └── Dockerfile.cn
├── LICENSE
├── README.md
└── stabilityai
    └── sdxl-turbo
        ├── model_index.json
        ├── scheduler
        ├── sd_xl_turbo_1.0_fp16.safetensors
        ├── sd_xl_turbo_1.0.safetensors
        ├── text_encoder
        ├── text_encoder_2
        ├── tokenizer
        ├── tokenizer_2
        ├── unet
        ├── vae
        ├── vae_decoder
        └── vae_encoder
运行模型
因为使用 Docker ,所以运行模型非常简单,只需要执行下面的命令即可:
docker run --rm -it -p 7860:7860 -p 7680:7680 -p 8080:8080 --gpus all --ipc=host --ulimit memlock=-1 -v `pwd`:/app soulteary/sdxl-turbo-runtime python app.py
当命令执行完毕,我们会看到类似下面的日志:
=============
== PyTorch ==
=============

NVIDIA Release 23.12 (build 76438008)
PyTorch Version 2.2.0a0+81ea7a4

Container image Copyright (c) 2023, NVIDIA CORPORATION & AFFILIATES. All rights reserved.

Copyright (c) 2014-2023 Facebook Inc.
Copyright (c) 2011-2014 Idiap Research Institute (Ronan Collobert)
Copyright (c) 2012-2014 Deepmind Technologies    (Koray Kavukcuoglu)
Copyright (c) 2011-2012 NEC Laboratories America (Koray Kavukcuoglu)
Copyright (c) 2011-2013 NYU                      (Clement Farabet)
Copyright (c) 2006-2010 NEC Laboratories America (Ronan Collobert, Leon Bottou, Iain Melvin, Jason Weston)
Copyright (c) 2006      Idiap Research Institute (Samy Bengio)
Copyright (c) 2001-2004 Idiap Research Institute (Ronan Collobert, Samy Bengio, Johnny Mariethoz)
Copyright (c) 2015      Google Inc.
Copyright (c) 2015      Yangqing Jia
Copyright (c) 2013-2016 The Caffe contributors
All rights reserved.

Various files include modifications (c) NVIDIA CORPORATION & AFFILIATES.  All rights reserved.

This container image and its contents are governed by the NVIDIA Deep Learning Container License.
By pulling and using the container, you accept the terms and conditions of this license:
https://developer.nvidia.com/ngc/nvidia-deep-learning-container-license

WARNING: CUDA Minor Version Compatibility mode ENABLED.
  Using driver version 525.147.05 which has support for CUDA 12.0.  This container
  was built with CUDA 12.3 and will be run in Minor Version Compatibility mode.
  CUDA Forward Compatibility is preferred over Minor Version Compatibility for use
  with this container but was unavailable:
  [[Forward compatibility was attempted on non supported HW (CUDA_ERROR_COMPAT_NOT_SUPPORTED_ON_DEVICE) cuInit()=804]]
  See https://docs.nvidia.com/deploy/cuda-compatibility/ for details.

The cache for model files in Transformers v4.22.0 has been updated. Migrating your old cache. This is a one-time only operation. You can interrupt this and resume the migration later on by calling `transformers.utils.move_cache()`.
0it [00:00, ?it/s]
Loading pipeline components...: 100%|██████████████████████████████████████████████████████████████████████████████████████████████████████████████████████| 7/7 [00:00<00:00,  9.46it/s]
Loading pipeline components...: 100%|██████████████████████████████████████████████████████████████████████████████████████████████████████████████████████| 7/7 [00:00<00:00, 12.78it/s]
Running on local URL:  http://0.0.0.0:7860

To create a public link, set `share=True` in `launch()`.
然后,我们在浏览器访问容器运行主机的 IP:7860 就可以开始体验和验证 SD XL Turbo 啦。
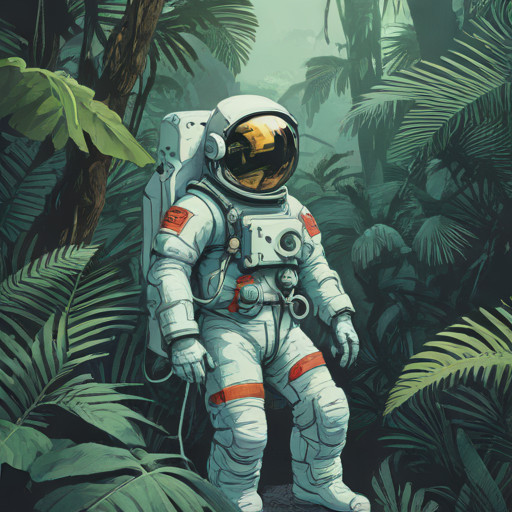
接下来,我们可以输入任意的内容,来让它进行图片生成,比如我使用的是下面的 Prompt (提示词):
# 丛林中的宇航员,冷色调,柔和的色彩,详细,8k

Astronaut in a jungle, cold color palette, muted colors, detailed, 8k
你会发现,当我们在输入的时候,图片会非常快速的被生成出来。
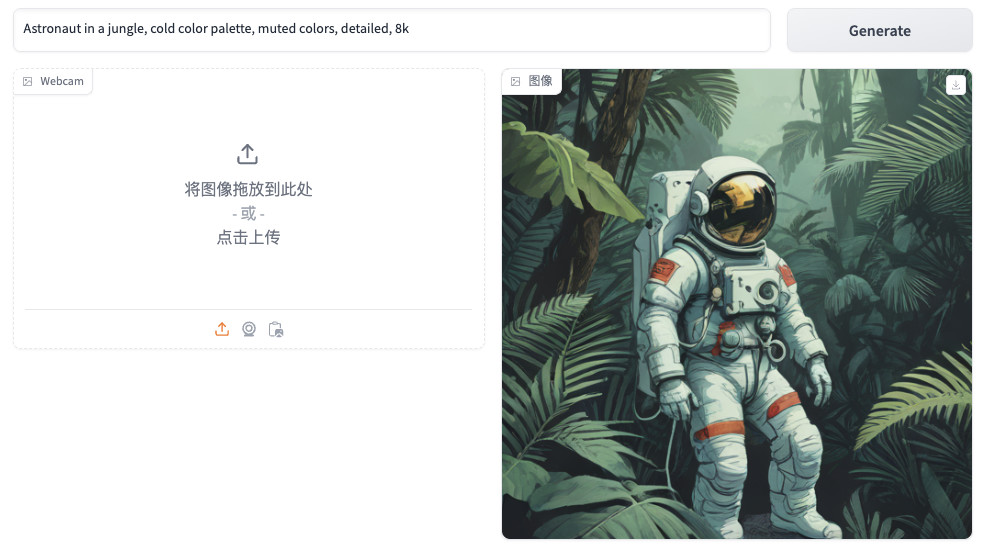
不论我们是使用调整 Prompt 提示词文本,还是拖拽界面下面的参数,图片都会被快速的重新生成。如果你对参数还不是很了解,可以阅读文末的“AI Pipeline 参数概述”。
如果我们检查服务日志,你会发现除了第一次生成较慢,在 0.75s 左右,剩下的渲染基本都在 0.13-0.14 秒。
Pipe took 0.752417802810669 seconds
Pipe took 0.13779544830322266 seconds
Pipe took 0.13955378532409668 seconds
Pipe took 0.1433868408203125 seconds
Pipe took 0.13985347747802734 seconds
Pipe took 0.13831496238708496 seconds
接下来,我们来尝试“图生图”模式,这里我将网上搜索到的 Prompt 进行了简单的修改,试着让模型将图片中的“宇航员”换成“蝙蝠侠”:
# 蝙蝠侠万圣节服装的肖像,面部彩绘,眩光姿势,详细,复杂,色彩丰富,电影灯光,艺术站趋势,8k,超现实,聚焦,极端细节,虚幻引擎 5 电影,杰作

Portrait of The batman halloween costume, face paintin, glare pose, detailed, intricate, full of colour, cinematic lighting, trending on artstation, 8k, hyperrealistic, focused, extreme details, unreal engine 5 cinematic, masterpiece
如果我们将上面生成的图片上传到界面,并且调整生成图片的提示词如上,接着点击“生成按钮”,或者稍微调整下参数,触发图片重新生成:
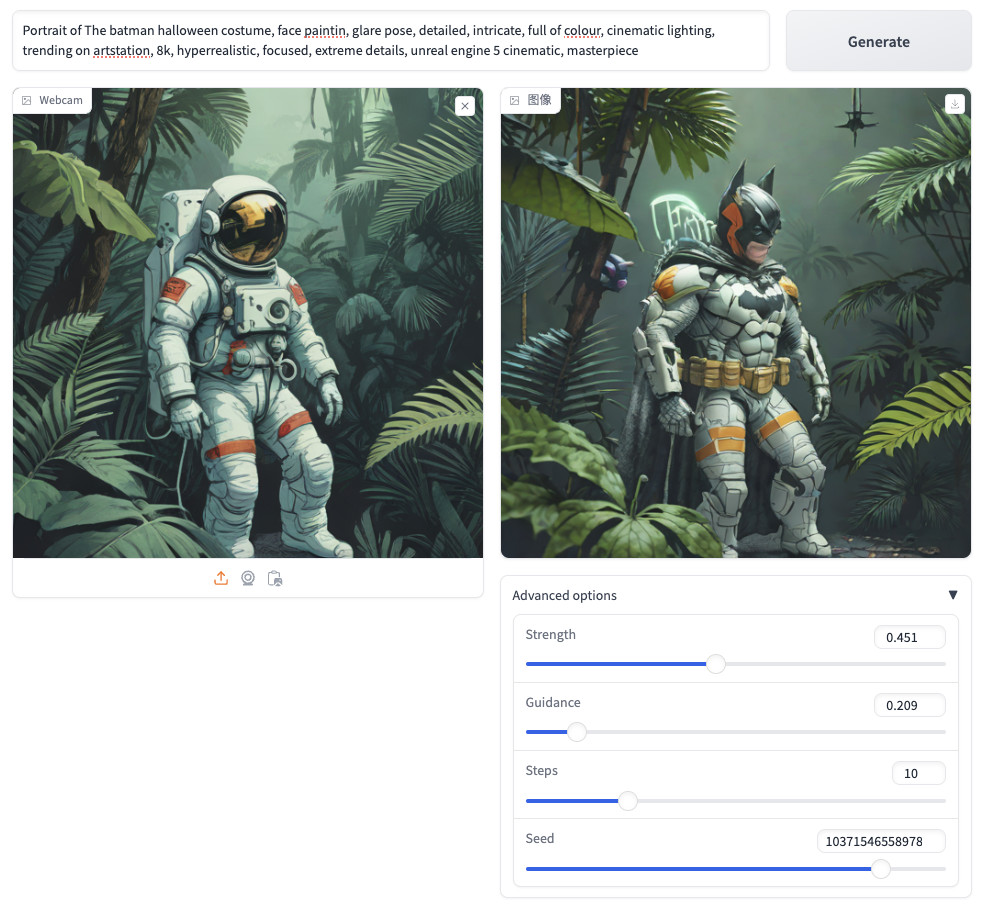
你会发现,依旧是非常迅速的即时生成体验。同样的,我们可以随意调整提示词或者参数,或者换张图片,程序都会比较迅速的完成我们的生成任务:
Pipe took 0.23278570175170898 seconds
Pipe took 0.21840667724609375 seconds
Pipe took 0.21840357780456543 seconds
Pipe took 0.21806550025939941 seconds
Pipe took 0.2180163860321045 seconds
当我们查看显卡使用情况,会发现差不多需要 16G+ 左右的显存。
+-----------------------------------------------------------------------------+
| NVIDIA-SMI 525.147.05   Driver Version: 525.147.05   CUDA Version: 12.0     |
|-------------------------------+----------------------+----------------------+
| GPU  Name        Persistence-M| Bus-Id        Disp.A | Volatile Uncorr. ECC |
| Fan  Temp  Perf  Pwr:Usage/Cap|         Memory-Usage | GPU-Util  Compute M. |
|                               |                      |               MIG M. |
|===============================+======================+======================|
|   0  NVIDIA GeForce ...  Off  | 00000000:01:00.0 Off |                  Off |
| 31%   37C    P2    63W / 450W |  16490MiB / 24564MiB |      0%      Default |
|                               |                      |                  N/A |
+-------------------------------+----------------------+----------------------+

+-----------------------------------------------------------------------------+
| Processes:                                                                  |
|  GPU   GI   CI        PID   Type   Process name                  GPU Memory |
|        ID   ID                                                   Usage      |
|=============================================================================|
|    0   N/A  N/A      1504      G   /usr/lib/xorg/Xorg                 75MiB |
|    0   N/A  N/A      1612      G   /usr/bin/gnome-shell               16MiB |
|    0   N/A  N/A     10984      C   python                          16394MiB |
+-----------------------------------------------------------------------------+
SDXL Turbo AI Pipeline 参数概述
Strength 生成过程中非常重要的参数,它决定了我们使用的图片和最终生成图片有多相似。 如果我们希望生成图片和原始图片比较相似,我们需要尽可能调低 strength 的数值。如果你希望模型更有创造力,那么可以将 strength 数值往接近 1 的方向拉高。
Steps 是另外一个重要参数,它决定了程序将花多少功夫来完成图片的生成。并且和 strength 息息相关,如果我们将 strength 设置为 0.6(和原图 60% 相似),并设置 step 为 2 ,那么模型将对原始图片进行两次添加 0.6 步的噪声,然后再进行两次去噪,然后我们就得到了最终的图片结果。
Guidance 是用于控制生成图像和我们输入的文本对齐的程度,我们可以拉高 guidance 的数值,让图像和我们输入的提示词更加一致,也可以将 guidance 数值保持在比较低的程度,让模型更加有创意。比如,我们可以将 strength 和 guidance 都保持在比较低的数值,让模型生成类似原始图像,但是更有趣的结果。
最后
好了,这篇文章就先写到这里啦。
有机会的时候,我们聊聊如何使用 SDXL Turbo 实现 Midjourney 的“混图”(图生图生图),以及如何控制图片尽量趋近于我们想要的结果,还有性能优化。
–EOF